2-Ingredient Oreo Sushi Recipe
Ingredients:
- 24 Oreos (one package), separated into cookies and cream filling
- 1/4 cup milk
Instructions:
Prepare the Oreo Dough:
- In a food processor, blitz the Oreo cookies (without the cream) until they become fine crumbs.
- Add 3 tablespoons of milk to the food processor and blend until the mixture forms a ball of dough.
Shape the Dough: 3. Place the Oreo dough on a sheet of plastic wrap. 4. Press it into a rough square shape and use a rolling pin to roll it into an even layer about 1/4 inch thick. 5. Trim the edges to create a perfect square.
Prepare the Filling: 6. In a bowl, mix the Oreo cream filling with 2 teaspoons of milk until smooth and creamy.
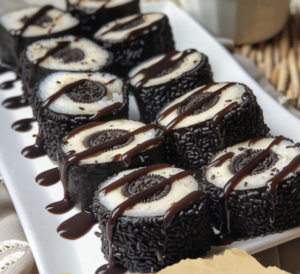
Assemble the Sushi: 7. Evenly spread the creamy filling over the rolled-out Oreo dough. 8. Roll up the dough into a log, using the plastic wrap to help you.
Chill and Serve: 9. Optional: Wrap the roll in plastic wrap and refrigerate to firm it up. 10. Unwrap, slice into sushi-sized pieces, and enjoy!
Most 20 Popular Questions and Their Answers Related to 2-Ingredient Oreo Sushi Recipe
- Can I use a different type of cookie?
- Yes, you can experiment with different cookies, but the texture and flavor may vary.
- How long does it take to prepare this recipe?
- It takes about 15-20 minutes to prepare and assemble the Oreo sushi.
- Can I use a rolling pin to crush the Oreos instead of a food processor?
- Yes, you can place the cookies in a ziplock bag and crush them with a rolling pin, but a food processor yields finer crumbs.
- What can I use if I don’t have plastic wrap?
- You can use parchment paper or a silicone mat to roll out and shape the dough.
- Is it necessary to chill the roll before slicing?
- Chilling helps firm up the roll, making it easier to slice, but it’s optional.
- Can I add other ingredients to the filling?
- Yes, you can add things like cream cheese, peanut butter, or fruit preserves for added flavor.
- How do I store leftovers?
- Store any leftover sushi in an airtight container in the refrigerator for up to 3 days.
- Can I make this recipe vegan?
- Use vegan cookies and plant-based milk to make it vegan.
- What is the best way to slice the sushi?
- Use a sharp knife and clean it between cuts for cleaner slices.
- Can I use flavored milk?
- Yes, flavored milk like almond or soy milk can add an extra taste dimension.
- Is there a gluten-free version?
- Use gluten-free cookies and ensure all other ingredients are gluten-free.
- How many servings does this recipe make?
- This recipe makes about 12-16 sushi pieces, depending on the thickness of your slices.
- Can I use a different method to mix the filling?
- Mixing by hand or using an electric mixer works fine to combine the cream filling and milk.
- What can I do if my dough is too dry?
- Add a little more milk, one teaspoon at a time, until the dough is pliable.
- How can I make the sushi look more authentic?
- You can use fruit leather or thinly sliced fruit to wrap around the sushi for a more authentic look.
- Can I add food coloring to the filling?
- Yes, adding a few drops of food coloring can make the filling more visually appealing.
- What is the best way to serve these?
- Serve them chilled with a drizzle of chocolate sauce or a dollop of whipped cream.
- Can I prepare this in advance?
- Yes, you can prepare it a day ahead and store it in the refrigerator until ready to serve.
- How do I prevent the dough from sticking to the rolling pin?
- Use a piece of plastic wrap or parchment paper on top of the dough while rolling it out.
- What can I do if I don’t have a food processor?
- You can crush the cookies manually using a ziplock bag and a rolling pin, but ensure they are finely crushed.