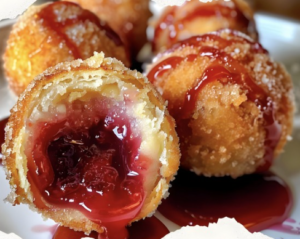
Cherry Pie Bombs 

Ingredients:
For the Cherry Pie Bombs:
- 1 package (8 oz) refrigerated crescent roll dough
- 1 cup cherry pie filling
- Oil for frying
For the Glaze:
- 1 cup powdered sugar
- 2 tablespoons milk
- 1/2 teaspoon vanilla extract
Directions:
- Prepare the Dough:
- Unroll the crescent roll dough and cut it into 16 squares.
- Place a small spoonful of cherry pie filling in the center of each square.
- Form the Bombs:
- Fold the dough over the filling, pinching the edges to seal tightly. Ensure they are well sealed to prevent the filling from leaking out during frying.
- Fry the Bombs:
- Heat oil in a deep fryer or large saucepan to 350°F (175°C).
- Fry the cherry pie bombs in batches, turning once, until golden brown, about 2-3 minutes.
- Use a slotted spoon to remove from oil and drain on paper towels.
- Make the Glaze:
- In a small bowl, whisk together powdered sugar, milk, and vanilla extract until smooth. If the glaze is too thick, add more milk, one teaspoon at a time, until desired consistency is reached.
- Glaze and Serve:
- While the cherry pie bombs are still warm, drizzle them with the glaze or dip them in the glaze to coat.
- Let set for a few minutes before serving.
Nutritional Information:
- Prep Time: 15 minutes
- Cooking Time: 3 minutes
- Total Time: 18 minutes
- Calories: 100 kcal per bomb
- Servings: 16 bombs
Achieving the perfect Cherry Pie Bombs involves a combination of careful preparation, precise cooking, and a few expert tips. Here are 20 secrets to help you make the most delicious and visually appealing Cherry Pie Bombs:
- Use Cold Dough:
- Keep the crescent roll dough cold until you’re ready to use it. This helps prevent the dough from becoming too sticky and difficult to work with.
- Dry the Cherry Filling:
- Use a paper towel to gently pat the cherry pie filling to remove excess moisture. This prevents the filling from leaking out during frying.
- Proper Sealing:
- Ensure the edges of the dough are sealed tightly. Use a fork to press the edges together to create a secure seal.
- Use a Muffin Tin:
- If you have trouble keeping the bombs intact, place them in a greased muffin tin. This helps maintain their shape while frying.
- Control the Oil Temperature:
- Use a thermometer to maintain the oil temperature at 350°F (175°C). This ensures even cooking and prevents burning.
- Don’t Overcrowd the Pan:
- Fry a few bombs at a time to avoid lowering the oil temperature. Overcrowding can result in uneven cooking.
- Fry in Batches:
- Cook the bombs in small batches to ensure they fry evenly and don’t stick together.
- Drain Properly:
- Use a slotted spoon to remove the bombs from the oil and place them on paper towels to drain excess oil.
- Cool Before Glazing:
- Let the bombs cool slightly before glazing to prevent the glaze from melting off.
- Thin Glaze Consistency:
- Ensure the glaze is thin enough to drizzle easily. If it’s too thick, add a few more drops of milk.
- Uniform Size:
- Cut the dough into uniform squares to ensure even cooking and a consistent look.
- Use Fresh Oil:
- Use fresh oil for frying to avoid any off-flavors and to achieve a crispier texture.
- Check for Leaks:
- Inspect each bomb before frying to ensure there are no holes or gaps where the filling can leak out.
- Variations:
- Experiment with different fillings like apple, blueberry, or chocolate chips for variety.
- Double Layer of Dough:
- For extra security, you can use two layers of dough, sealing the edges well to prevent filling leakage.
- Preheat Oil Properly:
- Make sure the oil is fully preheated before adding the bombs. Adding them to oil that’s not hot enough can result in greasy, undercooked bombs.
- Experiment with Flavors:
- Add a sprinkle of cinnamon or nutmeg to the dough for extra flavor.
- Keep an Eye on Cooking Time:
- Monitor the frying time closely to ensure the bombs are golden brown and cooked through.
- Practice Patience:
- Allow the bombs to cool and the glaze to set properly before serving for the best texture and flavor.
- Serve Immediately:
- These are best enjoyed fresh and warm. Prepare them just before serving for maximum enjoyment.
Most 20 Popular Questions and Their Answers Related to Cherry Pie Bombs
- Q: Can I use other pie fillings instead of cherry? A: Yes, you can use any pie filling such as apple, blueberry, or peach.
- Q: Can I bake these instead of frying? A: Yes, bake them at 375°F (190°C) for 10-12 minutes or until golden brown.
- Q: How do I store leftover cherry pie bombs? A: Store them in an airtight container at room temperature for up to 2 days.
- Q: Can I make these ahead of time? A: Yes, you can assemble them and refrigerate. Fry or bake them when ready to serve.
- Q: Can I freeze cherry pie bombs? A: Yes, freeze before frying. Thaw slightly before frying or baking.
- Q: How can I prevent the filling from leaking out? A: Ensure edges are well sealed by pinching tightly and using less filling.
- Q: Can I use homemade dough instead of crescent roll dough? A: Yes, you can use homemade dough if preferred.
- Q: What oil is best for frying? A: Vegetable oil or canola oil works best for frying.
- Q: Can I add additional flavors to the glaze? A: Yes, you can add a few drops of almond extract or lemon juice for extra flavor.
- Q: How do I know when the oil is hot enough? A: Use a thermometer to ensure the oil is 350°F (175°C) or drop a small piece of dough to see if it sizzles.
- Q: Can I use low-fat crescent roll dough? A: Yes, low-fat crescent roll dough can be used.
- Q: Are there any dipping sauces that go well with these? A: Vanilla icing or chocolate sauce are great options.
- Q: How do I reheat leftover cherry pie bombs? A: Reheat in the oven at 350°F (175°C) for about 5 minutes.
- Q: Can I add nuts to the filling? A: Yes, finely chopped nuts can be added to the cherry filling.
- Q: How thick should the glaze be? A: The glaze should be pourable but not too runny, like a thick syrup.
- Q: Can I use a different type of sugar for the glaze? A: Powdered sugar works best for a smooth glaze, but you can experiment with alternatives.
- Q: How can I make these gluten-free? A: Use gluten-free crescent roll dough and ensure other ingredients are gluten-free.
- Q: What’s the best way to serve these? A: Serve warm for the best taste, with glaze freshly applied.
- Q: Can I add food coloring to the glaze? A: Yes, you can add food coloring to make the glaze more festive.
- Q: Can I use fresh cherries instead of pie filling? A: Yes, but you need to cook them down with some sugar and cornstarch to create a thick filling.