Simple DIY Stain Remover: Create Your Own Powerful Homemade Stain Remover!
What You Need:
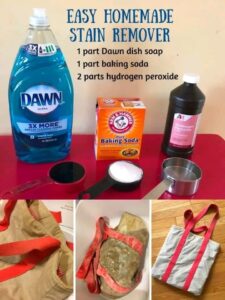
- 1 part Dawn dish liquid (the blue one works wonders!)
- 1 part baking soda
- 2 parts hydrogen peroxide
Let’s Mix It Up:
- Find a Spray Bottle: Any clean, empty spray bottle or container will do.
- Mix Dawn & Baking Soda: Combine equal parts of Dawn and baking soda in your container.
- Add Hydrogen Peroxide: Pour in double the amount of hydrogen peroxide. This is the secret sauce!
- Shake or Stir: Gently mix everything until fully blended. Your stain-fighting hero is ready!
Usage:
- Spray directly onto stains before washing.
- Let it sit for a few minutes for tough stains.
- Wash as usual and watch the magic happen!
20 Popular Questions and Answers related to Simple DIY Stain Remover:
- Can I use any dish soap or does it have to be Dawn?
- While any dish soap may work, Dawn is preferred for its grease-fighting power.
- Is this stain remover safe for all fabrics?
- This stain remover is generally safe for most fabrics, but it’s always a good idea to test it on a small, inconspicuous area first.
- Can I store this stain remover for future use?
- Yes, you can store the stain remover in a sealed container for future use. Just give it a shake before using again.
- Does this stain remover work on old stains?
- While it may not completely remove old stains, it can help lighten them. For best results, treat stains as soon as possible.
- Can I use this stain remover on carpets and upholstery?
- Yes, you can use this stain remover on carpets and upholstery. Just be sure to test it on a small area first to ensure it doesn’t cause any damage.
- Is this stain remover safe for colored fabrics?
- Yes, this stain remover is generally safe for colored fabrics, but it’s always a good idea to test it first to be sure.
- Can I add essential oils for fragrance?
- Yes, you can add a few drops of your favorite essential oils for fragrance if desired.
- How long should I let the stain remover sit before washing?
- For tough stains, let the stain remover sit for a few minutes before washing.
- Can I use this stain remover on delicate fabrics?
- It’s best to avoid using this stain remover on delicate fabrics, as it may be too harsh.
- Can I use this stain remover on baby clothes?
- Yes, this stain remover is safe for use on baby clothes, but it’s always a good idea to test it first.
- Will this stain remover remove grease stains?
- Yes, Dawn dish soap is known for its ability to remove grease stains.
- Can I use this stain remover on wine stains?
- Yes, this stain remover can help lift and dissolve wine stains.
- Can I use this stain remover on white clothes?
- Yes, this stain remover is safe for use on white clothes.
- Is this stain remover safe for use around pets?
- While the ingredients are generally safe, it’s best to keep pets away from the area until the stain remover has been washed away.
- Can I use this stain remover on upholstery?
- Yes, you can use this stain remover on upholstery. Test it on a small area first to ensure it won’t cause any damage.
- Can I use this stain remover on outdoor furniture cushions?
- Yes, this stain remover can be used on outdoor furniture cushions. Test it on a small area first to be sure.
- Can I use this stain remover on blood stains?
- Yes, this stain remover can help lift and dissolve blood stains.
- Will this stain remover work on set-in stains?
- While it may not completely remove set-in stains, it can help lighten them.
- Can I use this stain remover on silk?
- It’s best to avoid using this stain remover on silk, as it may be too harsh.
- Can I use this stain remover on carpet stains?
- Yes, this stain remover can be used on carpet stains. Blot the stain with a clean cloth after applying the remover.