Ingredients:
Rice Krispies Crust:
- 1/2 cup (1 stick) unsalted butter
- 1 (10-oz.) bag of marshmallows
- 8 cups Rice Krispies cereal
Cheesecake:
- 1 cup heavy cream
- 2 (8-oz.) blocks cream cheese, softened
- 1/2 cup confectioners’ sugar
- 3/4 cup Marshmallow Fluff
- 1 tsp pure vanilla extract
Directions:
- Prepare the Rice Krispies Crust:
- In a large pot over medium heat, melt the butter. Add marshmallows and cook, stirring frequently, until completely melted (about 5-8 minutes). Remove from heat.
- Add the Rice Krispies cereal to the melted marshmallow mixture and stir until well combined.
- Transfer about 3 cups of the Rice Krispies mixture to a 9″ x 5″ loaf pan. Gently press down into an even layer.
- Transfer the remaining Rice Krispies mixture to a 9″ springform pan. Gently press into an even layer across the bottom and up the sides of the pan. Refrigerate until ready to use.
- Prepare the Cheesecake Filling:
- In a large bowl, using a handheld mixer on medium-high speed, beat the heavy cream until stiff peaks form.
- In another large bowl, using the handheld mixer on medium-high speed, beat the cream cheese and confectioners’ sugar until smooth. Add the Marshmallow Fluff and vanilla extract, and beat until combined.
- Add the whipped cream to the cream cheese mixture and gently fold until just combined.
- Pour the cheesecake filling into the Rice Krispies crust and smooth the top. Refrigerate until chilled, at least 4 hours or up to overnight.
- Serve:
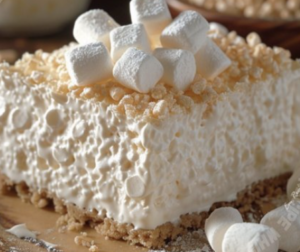
- Cut the Rice Krispies mixture in the loaf pan into 1-inch squares. Pile them in the middle of the cheesecake as decoration.
- Slice and enjoy!
Secrets and Tips to Achieve the Perfect Rice Krispie Cheesecake
- Fresh Ingredients: Use fresh marshmallows and Rice Krispies cereal for the best texture and taste.
- Proper Melting: Melt the butter and marshmallows slowly over medium heat to prevent burning and ensure a smooth mixture.
- Non-Stick Spray: Lightly spray your hands or a spatula with non-stick spray to easily press the Rice Krispies mixture into the pan.
- Even Layer: Press the Rice Krispies mixture evenly across the bottom and up the sides of the pan for a uniform crust.
- Firm Press: Press the mixture firmly but not too hard to avoid a tough crust.
- Chill the Crust: Refrigerate the crust for at least 30 minutes before adding the filling to help it set and hold its shape.
- Room Temperature Cream Cheese: Ensure the cream cheese is at room temperature for a smooth and creamy filling.
- Whip the Cream: Beat the heavy cream until stiff peaks form for a light and airy cheesecake filling.
- Slowly Incorporate Sugar: Add the confectioners’ sugar gradually to avoid lumps and ensure it mixes thoroughly with the cream cheese.
- Fold Gently: Fold the whipped cream into the cream cheese mixture gently to maintain the light texture.
- Use Real Vanilla Extract: Use pure vanilla extract for the best flavor.
- Chill the Cheesecake: Refrigerate the assembled cheesecake for at least 4 hours, or overnight, to allow the filling to set properly.
- Use a Springform Pan: A springform pan makes it easier to remove the cheesecake and achieve clean edges.
- Parchment Paper: Line the bottom of the pan with parchment paper for easy removal of the cheesecake.
- Avoid Overmixing: Mix the filling ingredients just until combined to avoid a dense texture.
- Add a Crunchy Topping: Consider adding a layer of crushed Rice Krispies treats on top for extra texture.
- Flavor Variations: Add a layer of fruit preserves, caramel, or chocolate ganache between the crust and filling for added flavor.
- Check for Freshness: Ensure your heavy cream and cream cheese are fresh for the best taste and texture.
- Avoid Overheating: Be careful not to overheat the marshmallow mixture, as it can become too hard when it cools.
- Balanced Sweetness: Adjust the amount of Marshmallow Fluff or confectioners’ sugar to your taste preference.
- Use a Mixer: Use an electric mixer to beat the cream cheese and sugar for a smooth filling.
- Smooth the Filling: Smooth the top of the cheesecake filling with a spatula for a neat finish.
- Cut with Hot Knife: Use a knife dipped in hot water to cut clean slices.
- Add Citrus: A touch of lemon zest in the filling can add a refreshing flavor contrast.
- Refrigerate Before Serving: Always serve the cheesecake chilled for the best texture.
- Avoid Overcrowding: Don’t overcrowd the pan with too much Rice Krispies mixture; keep it balanced.
- Mix Thoroughly: Ensure the Rice Krispies are thoroughly coated with the marshmallow mixture for even distribution.
- Store Properly: Store leftovers in an airtight container in the refrigerator to keep the cheesecake fresh.
- Decorate Before Serving: Add fresh fruit, whipped cream, or chocolate shavings just before serving for a beautiful presentation.
- Experiment with Flavors: Try different flavored marshmallows or add mix-ins like mini chocolate chips or crushed cookies to the Rice Krispies mixture for unique variations.
Popular Questions and Answers
- Can I use store-bought Rice Krispie treats for the crust?
- Yes, you can use store-bought Rice Krispie treats, but homemade will give a fresher taste and better texture.
- Can I use low-fat cream cheese?
- Yes, but the cheesecake may not be as rich and creamy.
- Can I substitute Marshmallow Fluff with melted marshmallows?
- Yes, but ensure the melted marshmallows are smooth and well-incorporated into the mixture.
- How long does it need to chill?
- At least 4 hours, but overnight is recommended for the best set.
- Can I freeze the cheesecake?
- Yes, you can freeze it. Thaw in the refrigerator before serving.
- What if I don’t have a springform pan?
- You can use a regular pie dish or baking pan, but serving may be more difficult.
- Can I add fruit toppings?
- Yes, fresh fruits like strawberries or blueberries make great toppings.
- Can I make the crust chocolate-flavored?
- Yes, add some cocoa powder to the marshmallow mixture or use Cocoa Krispies.
- Is there a gluten-free version?
- Use gluten-free crispy rice cereal.
- How do I prevent the crust from sticking to the pan?
- Line the pan with parchment paper or lightly grease it.
- Can I use a different cereal?
- Yes, any puffed rice cereal can work, but it will alter the taste.
- How do I store leftovers?
- Store in an airtight container in the refrigerator for up to 3 days.
- Can I add flavors to the cheesecake mixture?
- Yes, you can add flavor extracts like almond or lemon for variation.
- Can I use marshmallow creme instead of Marshmallow Fluff?
- Yes, both are similar and can be used interchangeably.
- What if my crust is too hard?
- Reduce the amount of cereal or press it more lightly into the pan.
- How do I make the cheesecake firmer?
- Add a bit of gelatin to the cream cheese mixture if a firmer texture is desired.
- Can I make this dairy-free?
- Use dairy-free butter, cream cheese, and whipped topping alternatives.
- How can I make it more festive?
- Add food coloring to the cheesecake mixture or decorate with sprinkles.
- Can I add chocolate chips to the cheesecake mixture?
- Yes, mini chocolate chips can be folded into the mixture.
- What kind of heavy cream should I use?
- Use heavy whipping cream for best results.
- Can I use less sugar?
- Yes, adjust the sugar to taste, but it may affect the sweetness balance.
- How do I ensure the filling is smooth?
- Make sure the cream cheese is fully softened before mixing.
- Can I make mini cheesecakes with this recipe?
- Yes, use a muffin tin with liners for individual portions.
- Is there a way to make it nut-free?
- Ensure all ingredients, especially the cereal, are nut-free.
- Can I add a drizzle of caramel or chocolate sauce?
- Yes, drizzling caramel or chocolate sauce on top is delicious.
- How do I transport this dessert?
- Keep it in the springform pan and cover tightly with plastic wrap for transport.
- Can I add a layer of jam or preserves?
- Yes, a layer of your favorite jam can be added between the crust and filling.
- Will the crust get soggy?
- The crust should remain crispy if kept refrigerated and not left out too long.
- Can I use flavored marshmallows?
- Yes, but it will change the flavor of the crust.
- How can I make it more stable for slicing?
- Chill thoroughly and use a sharp knife dipped in hot water for clean slices.