Reindeer Christmas Cookies Recipe

Reindeer Christmas Cookies Recipe

Ingredients:

  • 1 pack of Oreo cookies
  • Pretzels (mini pretzels work well)
  • Little eyeball sprinkles
  • 1 pack of cherry sour candies or red M&M’s
  • Chocolate chips or candy melts for coating
  • Optional: White chocolate or candy melts for decorating

Instructions:

1. Prepare Ingredients:

  • Gather all the ingredients and set up a workspace with parchment paper for easy cleanup.

2. Twist Oreos:

  • Carefully twist the Oreo cookies apart, separating the cream from the cookies. You will use the cream for the reindeer faces.

3. Make Antlers:

  • Break the pretzels into small pieces to create antlers for the reindeer. You’ll need two pretzel pieces per cookie.

4. Assemble Reindeer Faces:

  • Take a cherry sour candy or red M&M and press it into the center of the Oreo cream to create the reindeer’s nose. Place two little eyeball sprinkles above the nose.

5. Add Antlers:

  • Insert two pretzel pieces into the cream on either side of the nose to create antlers for your reindeer.

6. Melt Chocolate:

  • In a microwave-safe bowl, melt the chocolate chips or candy melts according to the package instructions. Stir until smooth.

7. Dip Cookies:

  • Hold each assembled reindeer cookie by the edges and dip it into the melted chocolate, ensuring it’s fully coated. Use a spoon to help cover the cookie completely.

8. Place on Parchment Paper:

  • Carefully place the dipped cookies on parchment paper to allow the chocolate to set.

9. Decorate with Drizzles (Optional):

  • If desired, melt white chocolate or candy melts and drizzle it over the reindeer cookies for added decoration. This step is optional but adds a festive touch.

10. Let Cool:

  • Allow the cookies to cool completely until the chocolate hardens.

11. Store:

  • Once the chocolate is fully set, store the reindeer Christmas cookies in an airtight container. They can be kept at room temperature or in the refrigerator.

12. Serve and Enjoy:

  • Plate these adorable reindeer Christmas cookies, and watch the delight on kids’ faces as they enjoy these festive treats!

These Reindeer Christmas Cookies are not only adorable but also a fun and creative activity for kids. Perfect for holiday parties, cookie exchanges, or as a sweet treat during the Christmas season!

 Here are some popular questions and their answers related to the Reindeer Christmas Cookies Recipe

1. Can I use a different type of cookie for this recipe?

  • Absolutely! While Oreos work well for this recipe, you can use any chocolate sandwich cookies or your favorite cookie as a base.

2. What can I substitute for cherry sour candies or red M&M’s for the reindeer’s nose?

  • Red Skittles, red jelly beans, or any small red candy can be used as a substitute for the cherry sour candies or red M&M’s.

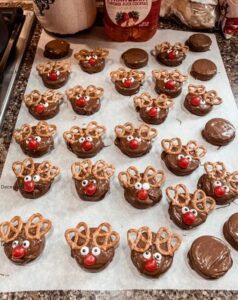
3. Can I use regular-sized pretzels instead of mini pretzels for the antlers?

  • Yes, you can use regular-sized pretzels and break them into smaller pieces to create antlers.

4. How do I prevent the chocolate from seizing when melting?

  • Make sure all utensils and bowls are completely dry, and avoid introducing any moisture to the melting chocolate. Use a low power setting or short bursts when melting in the microwave.

5. Can I use candy melts for both the coating and decorating?

  • Absolutely! Candy melts come in various colors and are perfect for both coating and decorating the reindeer cookies.

6. Are there alternatives to pretzels for antlers for those with allergies?

  • Yes, you can use small pretzel sticks, chocolate-covered pretzels, or even carefully shaped fondant for antlers.

7. How far in advance can I make these cookies?

  • These cookies can be made a few days in advance. Store them in an airtight container to maintain freshness.

8. Can I use white chocolate for coating instead of chocolate chips?

  • Yes, you can use white chocolate chips or candy melts for a lighter coating. It provides a nice contrast if you want a snowy look.

9. Can I freeze these cookies?

  • While it’s best to consume them fresh, you can freeze the cookies in an airtight container. Thaw them in the refrigerator before serving.

10. What other decorations can I add to these cookies? – Get creative! You can add festive sprinkles, edible glitter, or even small edible pearls for extra decoration.

11. Can I use milk chocolate instead of dark chocolate for coating? – Absolutely! Use your preferred type of chocolate for coating based on your taste preferences.

12. How long does it take for the chocolate to set? – The chocolate typically sets within 1-2 hours at room temperature. If you’re in a hurry, you can place them in the refrigerator for faster setting.

Enjoy making and sharing these delightful Reindeer Christmas Cookies with friends and family!

Absolutely, here are some secrets Secrets to achieve the Perfect Reindeer Christmas Cookies:

  1. Use Quality Ingredients:
    • Opt for high-quality chocolate, fresh ingredients, and vibrant sprinkles to enhance the overall taste and appearance of your cookies.
  2. Properly Melted Chocolate:
    • When melting chocolate, use a low heat setting and stir frequently to prevent burning or seizing. Ensure all utensils are dry, as even a small amount of moisture can cause chocolate to seize.
  3. Work Quickly:
    • Assemble the reindeer faces swiftly after melting the chocolate to ensure it adheres well to the cookies and allows you to attach antlers and other features before it sets.
  4. Creative Antlers:
    • Experiment with pretzel shapes or other edible alternatives for antlers. The more creative, the more festive your reindeer cookies will be.
  5. Uniform Size:
    • Ensure the reindeer faces are of a similar size and shape for a cohesive and professional look.
  6. Cool Cookies Completely:
    • Allow the cookies to cool completely before serving or storing to prevent the chocolate from smudging or sticking.
  7. Garnish with Care:
    • Add extra details like sprinkles or edible glitter while the chocolate is still wet to ensure they adhere properly. This adds a delightful touch to your reindeer cookies.
  8. Experiment with Toppings:
    • While the recipe suggests green onions for garnish, feel free to experiment with other toppings like crushed candy canes, shredded coconut, or even colored icing.
  9. Thoroughly Coat Cookies:
    • When dipping the cookies in chocolate, make sure they are fully coated. Use a spoon to help cover any missed spots.
  10. Chill Before Serving:
    • Allow the cookies to chill in the refrigerator for a short time after assembly. This helps the chocolate set completely and ensures the features stay in place.
  11. Get the Kids Involved:
    • This recipe is perfect for getting kids involved in the kitchen. Let them assist with dipping, decorating, and arranging the features for a fun family activity.
  12. Customize for Allergies:
    • If allergies are a concern, choose allergen-free chocolates, candies, and toppings to make the recipe safe for everyone.
  13. Presentation Matters:
    • Present your reindeer cookies on a festive platter or wrap them individually for a charming holiday gift.
  14. Experiment with Colors:
    • Try using different colors of chocolate or candy melts to create a variety of reindeer. White chocolate with colored details can add a snowy effect.
  15. Store Properly:
    • Store the cookies in an airtight container at room temperature. Layer them between sheets of parchment paper to prevent sticking.

With these secrets and tips, you’ll create not only adorable but also delicious Reindeer Christmas Cookies that will be the highlight of your festive celebrations!

Certainly! Here are additional tips to make your Reindeer Christmas Cookies even more delightful:

  1. Quality Chocolate:
    • Use high-quality chocolate for a smoother and more indulgent taste. Dark, milk or white chocolate can all work, depending on your preference.
  2. Temperature Control:
    • Ensure that the chocolate is at the right temperature for dipping. If it’s too hot, it might not adhere properly, and if it’s too cool, it may not coat the cookies evenly.
  3. Variety of Decorations:
    • Expand your decorating options by including various toppings. Mini chocolate chips, colored sugar, or edible pearls can add extra flair and texture.
  4. Festive Sprinkles:
    • Choose festive and holiday-themed sprinkles to add a burst of color and excitement to your reindeer cookies. Look for sprinkles shaped like holly leaves, snowflakes, or festive colors.
  5. Edible Eyes Options:
    • Experiment with different types of edible eyes, from small round ones to ones with eyelashes. This can give each reindeer a unique and playful personality.
  6. Dipping Techniques:
    • Try different dipping techniques for a variety of looks. Dip the entire cookie, half the cookie, or create a drizzle pattern with melted chocolate for added visual appeal.
  7. Melted White Chocolate Drizzle:
    • After the cookies have set, drizzle melted white chocolate over them for a snowy effect. This adds a touch of elegance to your reindeer cookies.
  8. Chill for a Crisp Finish:
    • Place the dipped cookies in the refrigerator to help the chocolate set quickly, resulting in a crisp and glossy finish.
  9. Add a Pop of Color:
    • Use red or green candy melts to create vibrant noses for your reindeer. This adds a pop of color to the cookies and enhances their festive look.
  10. Cookie Base Options:
    • Instead of Oreos, try using different types of cookies as the base. Gingerbread or sugar cookies can add different flavors to your reindeer creations.
  11. Coordinate Antler Colors:
    • Consider coordinating the color of the pretzel antlers with the chocolate. For example, use white chocolate with white or light-colored pretzels for a cohesive look.
  12. Drying Rack Technique:
    • Place dipped cookies on a cooling rack set over a baking sheet to allow excess chocolate to drip off. This helps in achieving a smoother finish.
  13. Theme Your Reindeer:
    • Create a theme for your reindeer cookies, such as Rudolph with a red nose or different expressions for each reindeer. This adds a playful element to your cookie collection.
  14. Get Creative with Names:
    • Give each reindeer cookie a creative name or label based on its unique features. This can add a fun and personalized touch.
  15. Share the Joy:
    • Share the joy by gifting these delightful reindeer cookies in festive boxes or bags. They make for adorable and tasty holiday presents.

With these additional tips, your Reindeer Christmas Cookies will not only be delightful but also a joy to create and share during the holiday season!

SAVE IT FOR LATER IN PINTEREST