Reese’s Peanut Butter Fudge
Ingredients:
- 16 oz crunchy peanut butter
- 16 oz white cake frosting
- 1 box of Reese’s Pieces
Directions:
- Prepare Your Equipment:
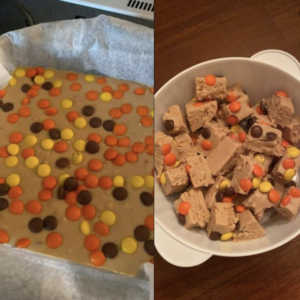
- Line a square casserole dish with wax paper for easy removal and clean-up.
- Melt the Peanut Butter:
- Place the jar of peanut butter in the microwave and heat for 1 minute and 50 seconds until it becomes smooth and easily stirrable.
- Melt the Frosting:
- Microwave the jar of white cake frosting for 1 minute until it’s soft and runny.
- Combine the Ingredients:
- In a mixing bowl, combine the melted peanut butter and the melted frosting. Stir until the mixture is well blended and smooth.
- Pour into Dish:
- Pour the mixture into the prepared square casserole dish, spreading it evenly with a spatula.
- Top with Reese’s Pieces:
- Sprinkle the Reese’s Pieces evenly over the top of the fudge mixture, pressing them down slightly so they stick.
- Chill:
- Place the dish in the refrigerator and let it cool for at least 1 hour, or until the fudge is firm.
- Serve:
- Once set, lift the fudge out of the dish using the wax paper. Cut into squares and serve.
Tips and Tricks for Perfect Reese’s Peanut Butter Fudge
- Use High-Quality Ingredients:
- For the best flavor, use high-quality peanut butter and frosting.
- Smooth Peanut Butter Option:
- If you prefer a smoother texture, you can use smooth peanut butter instead of crunchy.
- Stir Thoroughly:
- Ensure the peanut butter and frosting are thoroughly mixed to achieve a consistent texture.
- Microwave Timing:
- Microwave times may vary depending on the strength of your microwave. Keep an eye on the ingredients to prevent overheating.
- Alternative Toppings:
- You can substitute Reese’s Pieces with other toppings such as chopped nuts, mini chocolate chips, or M&Ms.
- Wax Paper Lining:
- Lining the dish with wax paper makes it easier to remove the fudge and clean up afterward.
- Chill Time:
- Allowing the fudge to cool in the refrigerator for at least an hour ensures it sets properly and is easy to cut.
- Cutting the Fudge:
- Use a sharp knife for clean cuts. You can also warm the knife slightly for smoother slicing.
- Storage:
- Store the fudge in an airtight container in the refrigerator to keep it fresh. It can last up to a week.
- Serving Size:
- Cut the fudge into small pieces as it is rich and indulgent.
- Adding Layers:
- For a layered effect, you can pour half of the mixture, add a layer of Reese’s Pieces, and then pour the remaining mixture on top.
- Double Boiler Method:
- If you prefer not to use a microwave, you can melt the peanut butter and frosting using a double boiler.
- Room Temperature Serving:
- Let the fudge sit at room temperature for a few minutes before serving for a softer texture.
- Variations:
- Experiment with different flavors of frosting and mix-ins to create your own unique fudge variations.
- Holiday Decor:
- For festive occasions, you can add colored sprinkles or edible glitter on top of the fudge.
- Gift Idea:
- Package the fudge in decorative tins or boxes for a homemade gift.
- Add a Pinch of Salt:
- Adding a pinch of sea salt can enhance the flavors and balance the sweetness.
- Peanut Allergies:
- If there are peanut allergies, you can substitute with almond or sunflower seed butter.
- Healthier Option:
- Use natural peanut butter and lower-sugar frosting for a slightly healthier version.
- Serving Suggestion:
- Serve the fudge with a scoop of vanilla ice cream for an extra special treat.
- Fun Shapes:
- Use cookie cutters to create fun shapes for kids’ parties.
- Uniform Pieces:
- Measure the pieces with a ruler for a professional look.
- Freezer Option:
- For longer storage, you can freeze the fudge. Just thaw it in the refrigerator before serving.
- Nutty Crunch:
- Add chopped nuts into the mixture for extra crunch.
- Drizzle Topping:
- Drizzle melted chocolate over the top for added decadence.
- Coconut Flakes:
- Sprinkle toasted coconut flakes on top for a tropical twist.
- Espresso Powder:
- Add a teaspoon of espresso powder to enhance the chocolate flavor.
- Marshmallow Fluff:
- Swirl in some marshmallow fluff for a creamy, gooey addition.
- Healthier Sweeteners:
- Try using agave syrup or honey instead of frosting for a different sweetener profile.
- Presentation:
- Arrange the fudge pieces on a decorative platter for a stunning presentation at parties.
Frequently Asked Questions (FAQs)
- Can I use smooth peanut butter instead of crunchy?
- Yes, smooth peanut butter can be used if you prefer a smoother texture.
- How long does the fudge need to chill?
- The fudge should chill in the refrigerator for at least 1 hour.
- Can I use other types of frosting?
- Yes, you can experiment with different flavors of frosting.
- How do I store the fudge?
- Store in an airtight container in the refrigerator for up to a week.
- Can I freeze the fudge?
- Yes, the fudge can be frozen for longer storage. Thaw in the refrigerator before serving.
- Is there an alternative to microwaving the ingredients?
- You can use a double boiler to melt the peanut butter and frosting.
- Can I add other toppings?
- Yes, you can add various toppings such as chopped nuts, chocolate chips, or sprinkles.
- What’s the best way to cut the fudge?
- Use a sharp knife, and you can warm it slightly for smoother slicing.
- Can I use natural peanut butter?
- Yes, natural peanut butter can be used for a healthier option.
- What if I have peanut allergies?
- Substitute peanut butter with almond butter or sunflower seed butter.
- Can I make this fudge vegan?
- Use vegan-friendly frosting and peanut butter to make it vegan.
- Can I use dark chocolate instead of Reese’s Pieces?
- Yes, dark chocolate chips or chunks can be used as an alternative.
- How can I make the fudge less sweet?
- Use less frosting or opt for a frosting with lower sugar content.
- Can I add a pinch of salt?
- Adding a pinch of sea salt can enhance the flavors.
- How can I make the fudge look more festive?
- Add colored sprinkles or edible glitter for a festive look.
- What can I do if the fudge is too soft?
- Ensure it is chilled long enough, or freeze it for a firmer texture.
- Can I add coconut flakes?
- Yes, toasted coconut flakes can be a delicious addition.
- What other mix-ins can I use?
- You can use marshmallows, toffee bits, or pretzels for added texture.
- How do I make my own Everything Bagel seasoning?
- Mix sesame seeds, poppy seeds, dried garlic, dried onion, and sea salt.
- Can I use almond butter instead of peanut butter?
- Yes, almond butter can be a great substitute for peanut butter.
Achieving the Perfect Delightful Reese’s Peanut Butter Fudge
With attention to detail and technique, you can master the art of making this delicious fudge. Here are 30 secrets to help you perfect this recipe:
- Use High-Quality Peanut Butter:
- Opt for a good brand of crunchy peanut butter to ensure the best flavor and texture.
- Fresh Ingredients:
- Always use fresh ingredients, especially the peanut butter and frosting, for optimal taste.
- Room Temperature:
- Allow the peanut butter and frosting to come to room temperature before microwaving for even melting.
- Proper Microwaving:
- Microwave the peanut butter in short intervals, stirring in between, to avoid overheating.
- Consistency:
- Ensure the peanut butter and frosting are fully melted and smooth before mixing to achieve a creamy fudge.
- Mixing:
- Mix the melted peanut butter and frosting thoroughly to create a consistent and homogeneous mixture.
- Wax Paper:
- Line the square casserole dish with wax paper to prevent sticking and ensure easy removal.
- Smooth Surface:
- Use a spatula to spread the fudge mixture evenly in the dish for a smooth and professional finish.
- Quick Mixing:
- Work quickly when combining the ingredients as the mixture can start to set rapidly.
- Pressing Toppings:
- Gently press the Reese’s Pieces into the surface of the fudge to ensure they stick well.
- Chill Time:
- Allow the fudge to chill in the refrigerator for at least 1 hour for it to set properly.
- Cutting:
- Use a sharp knife to cut the fudge into squares. Warm the knife slightly for cleaner cuts.
- Storage:
- Store the fudge in an airtight container in the refrigerator to keep it fresh and firm.
- Freezing:
- For longer storage, freeze the fudge and thaw it in the refrigerator before serving.
- Portion Size:
- Cut the fudge into small pieces as it is rich and indulgent.
- Uniform Pieces:
- Measure the pieces with a ruler to ensure uniformity, especially if giving as gifts.
- Decoration:
- Add a drizzle of melted chocolate or sprinkle sea salt on top for an extra touch.
- Flavor Variations:
- Experiment with different frosting flavors to create unique variations of the fudge.
- Natural Peanut Butter:
- Use natural peanut butter for a slightly different texture and a healthier option.
- Less Sweet Option:
- Use less frosting or opt for a lower sugar frosting to reduce the sweetness.
- Nut-Free Option:
- For those with nut allergies, substitute peanut butter with sunflower seed butter.
- Vegan Fudge:
- Use vegan-friendly frosting and peanut butter to create a vegan version of the fudge.
- Alternative Toppings:
- Try using other toppings like chopped nuts, mini marshmallows, or chocolate chips.
- Crunchy Texture:
- Add crushed pretzels or toffee bits to the fudge mixture for a crunchy texture.
- Presentation:
- Arrange the fudge pieces on a decorative platter for an appealing presentation at parties.
- Gift Wrapping:
- Package the fudge in decorative tins or boxes with wax paper for a homemade gift.
- Espresso Powder:
- Add a teaspoon of espresso powder to enhance the chocolate flavor.
- Peanut Butter Swirls:
- Swirl in extra peanut butter for a marbled effect and added flavor.
- Low-Fat Option:
- Use low-fat frosting and peanut butter for a lighter version of the fudge.
- Temperature:
- Let the fudge sit at room temperature for a few minutes before serving for a softer texture.
By following these tips and techniques, you can master the art of making Delightful Reese’s Peanut Butter Fudge and impress your friends and family with your culinary skills!