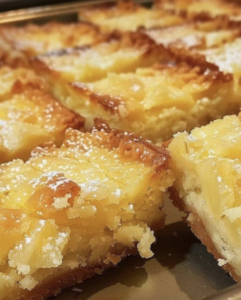
Pineapple Bliss Bars Recipe
Treat yourself to the heavenly taste of Pineapple Bliss Bars—tangy pineapple and creamy filling on a buttery crust!
Ingredients:
- 2 cups all-purpose flour
- 1/2 cup granulated sugar
- 1/2 cup unsalted butter, softened
- 1 can (20 oz) crushed pineapple, drained
- 1 cup sour cream
- 1/4 cup granulated sugar
- 2 large eggs
- 1 teaspoon vanilla extract
- Powdered sugar for dusting
Instructions:
- Preheat Oven: Preheat your oven to 350°F (175°C). Grease a 9×13 inch baking dish.
- Prepare the Crust:
- In a medium bowl, combine 2 cups of all-purpose flour and 1/2 cup granulated sugar.
- Cut in 1/2 cup softened unsalted butter until the mixture resembles coarse crumbs.
- Press the mixture evenly into the bottom of the prepared baking dish.
- Bake the Crust:
- Bake the crust for 15 minutes, or until lightly golden.
- Remove from the oven and let it cool slightly.
- Prepare the Filling:
- In a separate bowl, mix together the drained crushed pineapple, 1 cup sour cream, 1/4 cup granulated sugar, 2 large eggs, and 1 teaspoon vanilla extract until well blended.
- Add the Filling:
- Pour the pineapple mixture over the baked crust.
- Bake Again:
- Return to the oven and bake for an additional 25-30 minutes, or until the filling is set.
- Cool and Serve:
- Cool completely in the dish on a wire rack.
- Dust with powdered sugar before serving.
- Cut into bars and enjoy the Tropical Pineapple Bliss Bars—a delightful treat with a perfect balance of flavors!
Secrets to Achieve the Perfect Pineapple Bliss Bars:
- Use Fresh Pineapple: For a fresher flavor, use fresh pineapple instead of canned. Dice it finely and drain any excess juice.
- Proper Draining: Make sure to drain the crushed pineapple thoroughly to avoid a soggy crust.
- Room Temperature Butter: Use softened butter at room temperature for easier blending with the flour and sugar.
- Chill the Crust: After pressing the crust into the baking dish, chill it in the refrigerator for 10 minutes before baking to prevent shrinking.
- Even Layering: Ensure the crust layer is even to avoid uneven baking.
- Don’t Overmix the Filling: Mix the filling until just combined to avoid incorporating too much air, which can cause cracks.
- Use a Food Processor: If you have a food processor, use it to mix the crust ingredients for a more uniform texture.
- Line with Parchment Paper: Line the baking dish with parchment paper for easy removal and clean-up.
- Golden Crust: Bake the crust until it’s just golden to give it a perfect crispness without overbaking.
- Check for Doneness: The filling should be set but still slightly jiggly in the center when you remove it from the oven.
- Cool Completely: Allow the bars to cool completely in the baking dish to let the filling set properly.
- Use Fresh Eggs: Fresh eggs provide better structure and texture to the filling.
- Dust Right Before Serving: Dust with powdered sugar just before serving to keep the bars looking fresh.
- Test Different Sugars: Experiment with brown sugar in the crust for a deeper flavor.
- Add Coconut: Mix in some shredded coconut into the filling for a tropical twist.
- Use a Sharp Knife: Use a sharp knife to cut the bars for clean edges. Wipe the knife between cuts for neat slices.
- Garnish with Mint: Add a sprig of fresh mint on top for a touch of color and flavor.
- Refrigerate Before Serving: Chill the bars in the refrigerator for an hour before serving for a firmer texture.
- Serve with Ice Cream: Serve the bars with a scoop of vanilla ice cream for an extra indulgence.
- Flavor Infusions: Add a teaspoon of coconut or rum extract to the filling for an extra flavor boost.
Most Popular Questions and Their Answers:
- Can I use fresh pineapple instead of canned?
- Yes, finely dice fresh pineapple and drain any excess juice before using.
- What type of flour should I use?
- All-purpose flour works best for this recipe.
- Can I use salted butter instead of unsalted?
- Yes, but reduce the added salt in the recipe.
- How do I store Pineapple Bliss Bars?
- Store in an airtight container in the refrigerator for up to 5 days.
- Can I freeze these bars?
- Yes, freeze them in an airtight container for up to 2 months. Thaw in the refrigerator before serving.
- What if my crust is too crumbly?
- Ensure the butter is adequately cut into the flour mixture. Press firmly into the baking dish.
- Can I use a different type of sugar?
- Yes, you can use brown sugar for a richer flavor in the crust.
- Why is my filling not setting?
- Make sure to bake until the filling is just set and slightly jiggly in the center. Cool completely before cutting.
- Can I add other fruits?
- Yes, you can mix in other fruits like mango or berries with the pineapple.
- What’s the best way to cut the bars?
- Use a sharp knife and wipe it clean between cuts for neat slices.
- Can I make this recipe gluten-free?
- Yes, use a gluten-free all-purpose flour blend.
- Do I have to use sour cream?
- Sour cream adds a tangy flavor and creamy texture. You can substitute with Greek yogurt.
- What’s the purpose of powdered sugar on top?
- It adds a touch of sweetness and a decorative finish.
- How can I make the crust crispier?
- Chill the crust before baking and bake until just golden.
- Can I use whipped cream instead of sour cream?
- Whipped cream will change the texture, so it’s best to stick with sour cream or Greek yogurt.
- How long should I cool the bars before cutting?
- Cool completely, which can take about 1-2 hours at room temperature.
- What can I use instead of vanilla extract?
- You can use almond extract or coconut extract for a different flavor.
- Why is my crust shrinking?
- Chilling the crust before baking helps prevent shrinking.
- Can I add nuts to the recipe?
- Yes, adding chopped nuts like pecans or almonds to the filling or crust can add extra texture.
- How do I know when the filling is done?
- The filling should be set but still slightly jiggly in the center. It will firm up as it cools.