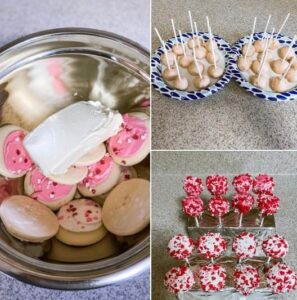
No-Bake Cake Pops Recipe:
Ingredients:
- 12 sugar cookies
- 1 block cream cheese
- White chocolate (or pink, or dye of your choice)
- Sprinkles
Instructions:
- Prepare Sugar Cookies:
- If you don’t have pre-made sugar cookies, bake a batch according to your favorite recipe or use store-bought ones. Allow them to cool completely.
- Crush Sugar Cookies:
- In a food processor or using a rolling pin, crush the sugar cookies into fine crumbs.
- Mix with Cream Cheese:
- In a mixing bowl, combine the cookie crumbs with the softened cream cheese. Mix until well combined. The mixture should have a dough-like consistency.
- Shape into Balls:
- Take small portions of the mixture and roll them into bite-sized balls. Place a straw or cake pop stick in the center of each ball.
- Chill in Refrigerator:
- Place the shaped cake pops in the refrigerator to chill for about 10 to 15 minutes. This helps them firm up and hold their shape.
- Melt Chocolate:
- While the cake pops are chilling, melt the white chocolate in a heatproof bowl. You can do this over a double boiler or in short bursts in the microwave, stirring between each burst.
- Dip Cake Pops:
- Once the cake pops are chilled, dip each one into the melted chocolate, ensuring it’s fully coated. Allow any excess chocolate to drip off.
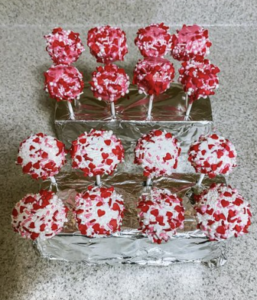
- Decorate with Sprinkles:
- Before the chocolate sets, decorate the cake pops with your favorite sprinkles. You can get creative with different colors and shapes.
- Chill Again:
- Place the decorated cake pops back into the refrigerator to allow the chocolate coating to set completely. This usually takes about 10 minutes.
- Serve and Enjoy:
- Once the chocolate is set, your no-bake cake pops are ready to be enjoyed! Serve them at parties, gatherings, or as a delightful treat.
Feel free to experiment with different types of cookies, coatings, and decorations to customize your no-bake cake pops according to your taste preferences!
Most popular questions and their answers related to the No Bake Cake Pops Recipe
Q: Can I use store-bought cake crumbs instead of sugar cookies? A: Yes, you can use store-bought cake crumbs if you prefer. The key is to have a crumbly texture that mixes well with the cream cheese.
Q: Can I use chocolate instead of white chocolate for coating? A: Absolutely! You can use any type of chocolate you like for coating the cake pops. Dark chocolate, milk chocolate, or even colored candy melts are great alternatives.
Q: How long do I need to chill the cake pops in the refrigerator? A: Chilling for about 10 to 15 minutes should be sufficient to firm up the cake pops before dipping them in chocolate.
Q: Can I skip the step of placing them on a stick? A: Yes, you can enjoy them as cake truffles without putting them on sticks. The stick is optional and is mostly for presentation.
Q: How far in advance can I make these cake pops? A: You can make them a day or two in advance. Store them in an airtight container in the refrigerator until you’re ready to serve.
Q: Can I freeze no-bake cake pops? A: While freezing is possible, it might affect the texture and appearance. It’s recommended to consume them within a few days for the best quality.
Q: Can I use different types of sprinkles or decorations? A: Absolutely! Feel free to get creative with various types of sprinkles, edible glitter, or other decorations to suit different occasions.
Q: What are some variations for the filling besides cream cheese? A: You can experiment with different fillings like chocolate ganache, flavored cream cheeses, or even Nutella for a unique twist.
Q: How do I prevent the cake pops from falling off the stick? A: Ensure the cake pops are chilled before dipping, and when dipping, make sure the coating covers the part where the stick is inserted to secure it.
Q: Can I make these without a food processor? A: Yes, you can crush the cookies by placing them in a sealed plastic bag and using a rolling pin to crush them into fine crumbs.
Certainly! Here are some secrets to achieving the perfect No-Bake Cake Pops:
- Consistent Texture: Ensure that the cake and cream cheese mixture is well-blended and has a consistent texture. This will make it easier to form uniform cake balls.
- Chill Before Shaping: After mixing the cake crumbs and cream cheese, chill the mixture in the refrigerator for at least 30 minutes. This makes it easier to shape the cake pops and prevents them from becoming too soft.
- Use a Melon Baller: For consistent-sized cake balls, consider using a melon baller to scoop out portions of the mixture before rolling them into balls.
- Quality Ingredients: Use high-quality chocolate and fresh ingredients. The better the ingredients, the better the final result.
- Balanced Sweetness: Be mindful of the sweetness level. If the cake crumbs are very sweet, you might want to adjust the amount of sweet coating or choose a less sweet chocolate.
- Dipping Technique: When dipping the cake pops into the melted chocolate, use a swirling motion to coat them evenly. Allow excess chocolate to drip off before placing them on the parchment paper.
- Avoid Overhandling: Handle the cake pops gently to avoid warming the mixture with your hands. Overhandling can lead to a softer texture.
- Decorate with Purpose: Choose decorations that complement the flavor of the cake pops. For example, if using a citrus-flavored cake, consider a drizzle of white chocolate and zest.
- Set Properly: Allow the cake pops to set completely before serving. Placing them in the refrigerator or freezer for a short time can speed up the setting process.
- Use Sturdy Sticks: When inserting sticks into the cake pops, make sure they are sturdy enough to hold the weight of the cake ball and the coating.
- Experiment with Flavors: Get creative with flavors by adding extracts, spices, or zest to the cake mixture. This adds depth to the taste.
- Personalize the Coating: Customize the chocolate coating by adding a contrasting drizzle or different types of chocolate. This not only enhances the appearance but also adds flavor complexity.
- Storage Tips: Store the cake pops in an airtight container to prevent them from drying out. If making them ahead, consider freezing and thawing before serving.
Remember, the key to perfect No-Bake Cake Pops is practice and experimentation. Adjust the elements to suit your preferences and enjoy the creative process!