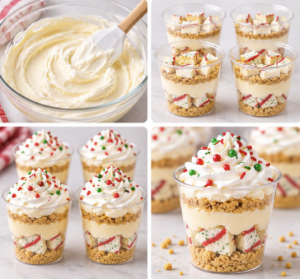
These Little Debbie Christmas Tree Cake Cups are a fun, festive no-bake dessert made with buttery graham cracker crumbs, fluffy cheesecake filling, pieces of Christmas Tree Cakes, whipped cream, and red-and-green holiday sprinkles.
Each clear dessert cup shows off the pretty layers, making these especially attractive for Christmas parties and holiday dessert tables.
The combination of soft vanilla cake, creamy cheesecake filling, crunchy graham crumbs, and fluffy whipped topping creates several textures in every spoonful.
They are perfect for Christmas parties, holiday potlucks, family gatherings, office celebrations, dessert tables, movie nights, or any occasion when you want an easy individual Christmas dessert.
Little Debbie is a trademark of its respective owner. This homemade recipe idea is independent and is not affiliated with or endorsed by the brand.
Why You’ll Love This Recipe
No baking required. Everything is mixed, layered, and chilled.
Perfect individual portions. Each guest gets their own dessert cup.
Festive appearance. Red, green, and white decorations make them instantly Christmas-ready.
Easy make-ahead dessert. Prepare the cups several hours before serving.
Creamy and crunchy. Graham crumbs contrast beautifully with the cheesecake filling.
Great for parties. Clear cups make serving neat and simple.
Easy to customize. Add white chocolate, vanilla pudding, crushed cookies, or peppermint.
Ingredients
Graham Cracker Layer
- 2 cups graham cracker crumbs
- 3 tablespoons unsalted butter, melted
- 2 tablespoons granulated sugar
Cheesecake Filling
- 8 ounces cream cheese, softened
- ¾ cup powdered sugar
- 1 teaspoon vanilla extract
- 1½ cups whipped topping
Cake Layer
- 6–8 Little Debbie Christmas Tree Cakes, cut into bite-size cubes
Whipped Topping
- 2 cups whipped topping
Decorations
- Red Christmas sprinkles
- Green Christmas sprinkles
- White sprinkles
- Extra Christmas Tree Cake pieces
Optional Additions
- White chocolate chips
- Vanilla pudding
- Crushed vanilla wafers
- Mini marshmallows
- White chocolate curls
Ingredient Notes
Christmas Tree Cakes
Cut the cakes into small cubes that fit comfortably inside the dessert cups.
Avoid crushing them completely because larger pieces create better texture and make the layers more visible.
Reserve a few attractive pieces for decorating the tops.
Cream Cheese
Use softened block-style cream cheese.
Softened cream cheese blends more smoothly with powdered sugar and produces a thick, creamy filling.
Graham Crackers
Graham cracker crumbs add a buttery cheesecake-crust flavor.
You can substitute:
- Vanilla wafer crumbs
- Golden sandwich-cookie crumbs
- Shortbread crumbs
Whipped Topping
Whipped topping keeps the cheesecake layer light and fluffy.
Keep it chilled until needed.
How to Make Little Debbie Christmas Tree Cake Cups
Step 1: Make the Graham Cracker Mixture
In a bowl, combine:
- Graham cracker crumbs
- Melted butter
- Granulated sugar
Stir until the crumbs are evenly coated.
Step 2: Add the First Crumb Layer
Spoon approximately:
2 tablespoons graham cracker mixture
into the bottom of each clear dessert cup.
Press very lightly.
Do not compact it too firmly.
Step 3: Make the Cheesecake Filling
Place softened cream cheese in a large mixing bowl.
Beat until completely smooth.
Step 4: Add Powdered Sugar and Vanilla
Add:
- Powdered sugar
- Vanilla extract
Beat until creamy.
Step 5: Fold in Whipped Topping
Gently fold in:
1½ cups whipped topping.
Mix until light and fluffy.
Step 6: Transfer to a Piping Bag
For cleaner layers, spoon the cheesecake filling into a piping bag or large zip-top bag.
Cut off the corner if needed.
Step 7: Add Cheesecake Filling
Pipe a layer of cheesecake filling over the graham cracker base.
Step 8: Add Christmas Tree Cake Pieces
Scatter several bite-size pieces of Christmas Tree Cake over the cheesecake layer.
Step 9: Add More Graham Crumbs
Sprinkle another thin layer of graham cracker crumbs over the cake pieces.
Step 10: Add More Cheesecake Filling
Pipe another layer of cheesecake mixture into the cup.
Step 11: Add Whipped Topping
Pipe a decorative swirl of whipped topping over the top.
Step 12: Decorate
Finish with:
- Red sprinkles
- Green sprinkles
- White sprinkles
- Small Christmas Tree Cake pieces
Step 13: Chill
Refrigerate for at least:
2 hours
before serving.
This helps the filling firm and allows the flavors to blend.
Step 14: Serve
Serve chilled directly from the individual cups.
Expert Tips for the Best Christmas Dessert Cups
Use clear cups. The visible layers are part of the presentation.
Soften the cream cheese completely. Cold cream cheese can leave lumps.
Use a piping bag. It keeps the layers neat and prevents smearing along the cup.
Don’t crush all the cake. Small cubes provide better texture.
Keep the crumb layer loose. Overpacking makes it difficult to scoop.
Chill before serving. The cheesecake filling becomes firmer and more flavorful.
Decorate near serving time. Sprinkles and cake pieces look freshest when added later.
Delicious Variations
White Chocolate Christmas Tree Cake Cups
Add mini white chocolate chips between the layers.
Finish with white chocolate curls.
Strawberry Christmas Cake Cups
Add chopped fresh strawberries between the cheesecake and cake layers.
Vanilla Pudding Christmas Cups
Add a layer of prepared vanilla pudding for an even creamier dessert.
Oreo Christmas Tree Cake Cups
Replace graham crumbs with crushed chocolate sandwich cookies.
Peppermint Christmas Tree Cake Cups
Add a tiny amount of peppermint extract to the cheesecake mixture.
Finish with crushed peppermint candy.
Mini Christmas Dessert Shooters
Use smaller cups for bite-size party servings.
Christmas Tree Cake Trifle
Instead of individual cups, layer everything in one large glass trifle bowl.
Cheesecake Pudding Cups
Use cheesecake-flavored instant pudding between the cake and cream cheese layers.
How to Make Them Look Like the Photo
For the layered presentation shown in your image, use clear cups and build the dessert in this order:
- Graham cracker crumbs
- Christmas Tree Cake cubes
- Cheesecake filling
- More graham crumbs
- More cheesecake filling
- Whipped cream swirl
- Red and green sprinkles
Keeping each layer fairly distinct gives the cups the cleanest appearance.
What to Serve With Christmas Tree Cake Cups
These dessert cups pair well with:
- Christmas cookies
- Peppermint Oreo truffles
- Coconut snowball bites
- Brownies
- Fudge
- Hot chocolate
- Coffee
- Chocolate-covered pretzels
For a Christmas dessert table, combine them with red, green, white, and chocolate treats for a balanced festive display.
Make Ahead & Holiday Prep
These cups are excellent for making ahead.
You can assemble them:
Up to 24 hours before serving.
Cover and refrigerate.
For the prettiest presentation, wait until shortly before serving to add:
- Final whipped cream
- Sprinkles
- Decorative cake pieces
This keeps everything looking fresh.
Storage
Refrigerator
Store covered in the refrigerator for approximately:
3–4 days.
Because the filling contains cream cheese and whipped topping, keep the cups refrigerated.
Freezing
Freezing fully assembled cups is not recommended because the whipped topping and cake texture may change after thawing.
For best results, enjoy them fresh from the refrigerator.
Frequently Asked Questions
Are these no-bake dessert cups?
Yes. No oven is required.
Can I make them the day before?
Absolutely. They are excellent make-ahead Christmas desserts.
Can I use vanilla pudding?
Yes. Add it as another layer or mix a little into the cheesecake filling.
Can I use graham crackers?
Yes. They create a classic cheesecake-style base.
Can I use vanilla wafers instead?
Yes. Vanilla wafers work very well.
Can I make one large dessert instead?
Yes. Layer everything in a trifle bowl or 9 x 13-inch dish.
Can I add strawberries?
Yes. Strawberries pair well with the vanilla cake and cheesecake filling.
Can I add white chocolate?
Absolutely.
How long should the cups chill?
At least 2 hours is ideal.
How many cups does this recipe make?
Depending on cup size, approximately 8–10 dessert cups.
Printable Little Debbie Christmas Tree Cake Cups Recipe
Prep Time: 25 minutes
Chill Time: 2 hours
Total Time: About 2½ hours
Yield: 8–10 cups
Ingredients
Graham Layer
- 2 cups graham cracker crumbs
- 3 tablespoons melted butter
- 2 tablespoons sugar
Cheesecake Filling
- 8 ounces cream cheese, softened
- ¾ cup powdered sugar
- 1 teaspoon vanilla
- 1½ cups whipped topping
Cake & Topping
- 6–8 Christmas Tree Cakes
- 2 cups whipped topping
- Red, green, and white sprinkles
Instructions
- Mix graham cracker crumbs, melted butter, and sugar.
- Add a layer of crumbs to each cup.
- Beat cream cheese until smooth.
- Add powdered sugar and vanilla.
- Fold in whipped topping.
- Transfer filling to a piping bag.
- Pipe cheesecake filling over the crumbs.
- Add Christmas Tree Cake pieces.
- Sprinkle with more graham crumbs.
- Add another cheesecake layer.
- Pipe whipped topping on top.
- Decorate with sprinkles and cake pieces.
- Refrigerate for at least 2 hours.
- Serve chilled.
Final Thoughts
Little Debbie Christmas Tree Cake Cups turn a familiar holiday snack cake into an easy layered dessert that looks festive enough for any Christmas gathering.
Buttery graham crumbs add crunch, the cheesecake filling stays smooth and fluffy, and pieces of vanilla Christmas Tree Cake create soft cake layers throughout each cup. A tall swirl of whipped topping and colorful sprinkles finishes the dessert with a cheerful holiday look.
They are especially practical for parties because they can be prepared ahead and already come portioned into individual servings.
For the best results, soften the cream cheese completely, keep the cake pieces chunky enough to add texture, use piping bags for clean layers, chill the cups thoroughly, and add the final sprinkles and decorations close to serving time.