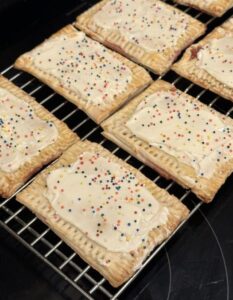
Homemade Strawberry Pop-Tarts
Mini Presentation: Get ready to embark on a delightful homemade pastry adventure with our Homemade Strawberry Pop-Tarts! With just a few simple ingredients, you can create a batch of delicious, flaky pop-tarts that are far better than the store-bought versions. These pop-tarts feature a sweet strawberry jelly filling, a golden, flaky crust, and colorful sprinkles. Your kids (and you) will love making and enjoying these treats.
Ingredients:
- Two boxes of premade pie crust
- Strawberry jelly (or your favorite flavor)
- One egg
- Frosting (store-bought or homemade)
- Sprinkles
Instructions:
- Preheat and Prepare: Preheat your oven to 425°F (220°C) and line a cookie sheet with parchment paper.
- Create the Pastry: Unroll the pie crusts and cut them into the desired pop-tart size. You should have 16 individual crust pieces.
- Add the Filling: Lay 8 of the crust pieces on the prepared cookie sheet. On each of these pieces, add approximately 1 teaspoon of strawberry jelly and spread it evenly, leaving a border around the edges.
- Seal and Vent: Place the remaining 8 crust pieces on top of the jelly-covered ones. Use a fork to crimp the edges, sealing the pop-tarts. Then, use a toothpick to poke a few holes in the top of each one to allow steam to escape during baking.
- Egg Wash: Create an egg wash by beating one egg. Brush the egg wash over the top of each pop-tart. This will give them a beautiful golden color as they bake.
- Bake and Cool: Bake the pop-tarts in the preheated oven for 7-8 minutes or until they are lightly golden brown. Once they’re done, transfer them to a wire cooling rack and allow them to cool.
- Frost and Sprinkle: Once the pop-tarts have cooled, it’s time to add frosting. You can use store-bought frosting or prepare your own. Decorate the pop-tarts with colorful sprinkles to make them even more fun and inviting.
- Enjoy: These homemade pop-tarts are a hit with kids and adults alike. You can store any leftovers in the refrigerator and warm them up whenever you’re ready to enjoy a tasty, homemade treat.
Make these Strawberry Pop-Tarts a part of your baking routine, and enjoy the delight of a sweet, fruity filling wrapped in a golden, flaky crust. They’re perfect for breakfast, brunch, or a sweet snack. Happy baking! 🍓🥮😋
Some Most Popular Questions and their Answers Related to Homemade Strawberry Pop-Tarts
Q: Can I use fresh strawberries instead of jam for the filling? A: Yes, you can use fresh strawberries to make the filling. Simply chop them into small pieces, cook them down with sugar to make a jam-like consistency, and use as directed in the recipe.
Q: Can I make these pop-tarts ahead of time and freeze them? A: Yes, you can assemble the pop-tarts and freeze them before baking. Place them on a baking sheet lined with parchment paper, freeze until solid, then transfer to a freezer-safe bag or container. When ready to bake, simply place them in the oven straight from the freezer, adding a few extra minutes to the baking time.
Q: Can I use store-bought pie crust instead of making my own? A: Yes, store-bought pie crust can be used to save time. Simply roll out the pie crust and cut it into rectangles as directed in the recipe.
Q: Can I use other types of fruit preserves or jams? A: Absolutely! You can use your favorite fruit preserves or jams, such as raspberry, blueberry, or apricot, instead of strawberry jam for the filling.
Q: How long do these pop-tarts stay fresh? A: These pop-tarts are best enjoyed within a few days of baking. Store them in an airtight container at room temperature for up to 3-4 days. You can also freeze any leftovers for longer storage.
Some Most Popular Questions and their Answers Related to Homemade Strawberry Pop-Tarts
- Use Fresh Ingredients: Fresh strawberries for the filling will impart a vibrant, natural flavor. Ensure your butter is fresh for the pastry dough to achieve the best texture and taste.
- Chill the Dough: After making the pastry dough, chill it in the refrigerator for at least 30 minutes before rolling it out. This helps prevent the dough from becoming too soft and sticky, making it easier to handle.
- Roll Evenly: Roll out the dough evenly to ensure uniform pop-tart shapes and consistent baking. Use a ruler or pastry cutter to create neat edges.
- Don’t Overfill: Avoid overfilling the pop-tarts with strawberry jam to prevent leakage during baking. Leave a small border around the edges when spreading the jam.
- Seal Properly: Seal the edges of the pop-tarts well to prevent the filling from oozing out during baking. Use a fork to crimp the edges firmly or press with your fingers.
- Ventilation: Cut small slits or poke holes in the top crust to allow steam to escape during baking. This helps prevent the pop-tarts from becoming soggy.
- Egg Wash: Brushing the tops of the pop-tarts with an egg wash (beaten egg) before baking adds shine and helps them develop a golden brown color.
- Cool Before Glazing: Allow the pop-tarts to cool completely before adding any glaze or icing. This prevents the glaze from melting and ensures a clean finish.
- Customize: Get creative with your toppings! Sprinkle coarse sugar, chopped nuts, or drizzle melted chocolate over the glazed pop-tarts for added flavor and texture.
- Storage: Store the cooled pop-tarts in an airtight container at room temperature for up to 3-4 days. If not consuming immediately, freeze them in a single layer, then transfer to a freezer bag for longer storage.