Halloween Pizza Skulls Recipe
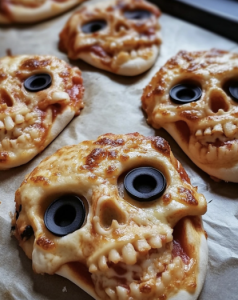
These Halloween Pizza Skulls are a fun and spooky way to serve pizza in an interactive form that both kids and adults will love! Shaped like skulls, they are stuffed with a delicious combination of pizza sauce, mozzarella cheese, pepperoni, and veggies. Perfect for a Halloween party or a themed dinner, these pizza pockets are easy to make and even easier to enjoy.
Ingredients:
- 1 can refrigerated pizza dough
- 1/2 cup pizza sauce
- 1 cup shredded mozzarella cheese
- 1/2 cup pepperoni slices, chopped
- 1/4 cup black olives, sliced
- 1/4 cup green bell pepper, diced
- 1/4 cup red onion, finely chopped
- Cooking spray
- 1/2 teaspoon dried oregano
- 1/2 teaspoon garlic powder
Step-by-Step Cooking Instructions:
Step 1: Preheat the Oven
Preheat your oven to 375°F (190°C). Spray your skull-shaped mold (or a baking sheet) with cooking spray to prevent sticking.
Step 2: Prepare the Pizza Dough
Unroll the refrigerated pizza dough on a clean, flat surface. Using a rolling pin, gently roll the dough out to even out any folds. Cut the dough into pieces large enough to fit into the cavities of your skull mold (or into rectangles for traditional pizza pockets).
Step 3: Layer the Pizza Filling
On each dough piece, spread about 1 tablespoon of pizza sauce, leaving a small border around the edges. Add 1-2 tablespoons of shredded mozzarella cheese, a few pieces of chopped pepperoni, black olives, green bell peppers, and red onions. Sprinkle the filling with a pinch of dried oregano and garlic powder for added flavor.
Step 4: Seal the Pizza Pockets
For skull molds, place another piece of dough on top and press around the edges to seal. If using a baking sheet, fold the dough rectangles in half and press the edges together to seal. You can crimp the edges with a fork for a tighter seal.
Step 5: Bake the Pizza Skulls
Place the filled molds (or baking sheet) in the preheated oven. Lightly spray the tops with cooking spray for a golden finish. Bake for 12-15 minutes, or until the dough is golden brown and fully cooked.
Step 6: Cool and Serve
Once done, remove the pizza skulls from the oven and allow them to cool for a few minutes before removing them from the mold. Serve them warm with extra pizza sauce on the side for dipping!
20 Most Popular Questions and Their Answers:
1. Can I use homemade pizza dough instead of canned?
Yes! Homemade dough works great for this recipe. Just make sure to roll it thin enough to fit in the mold or create even rectangles.
2. Can I use different fillings?
Absolutely! You can fill the pizza skulls with any of your favorite pizza toppings like sausage, mushrooms, or even pineapple.
3. How do I keep the filling from spilling out?
Make sure to seal the edges tightly by pressing down firmly or using a fork to crimp the edges.
4. Can I make these ahead of time?
Yes, you can prepare the pizza skulls in advance and refrigerate them. Bake them when you’re ready to serve.
5. Can I freeze the pizza skulls?
Yes! Freeze unbaked skulls and bake directly from frozen, adding a few extra minutes to the bake time.
6. What if I don’t have a skull mold?
No worries! You can make regular pizza pockets on a baking sheet.
7. Can I use different cheeses?
Yes, feel free to experiment with different cheeses like cheddar, provolone, or a pizza blend.
8. Are these good for kids?
Definitely! Kids love the fun skull shape and the delicious pizza flavors inside.
9. How do I make them extra crispy?
Brush the tops with melted butter or olive oil before baking for an extra crispy finish.
10. Can I add more veggies?
Of course! Add any of your favorite vegetables like mushrooms, spinach, or zucchini.
11. Can I use store-bought pizza sauce?
Yes, store-bought pizza sauce works perfectly. You can also make your own if you prefer.
12. How long can I store the leftovers?
Store any leftovers in an airtight container in the fridge for up to 3 days.
13. How do I reheat them?
Reheat in the oven at 350°F (175°C) for about 5-7 minutes to keep them crispy.
14. Can I make this gluten-free?
Yes, you can use gluten-free pizza dough for a gluten-free version.
15. Can I use fresh mozzarella?
Yes, but be sure to drain it well, as fresh mozzarella can release more moisture.
16. Can I use a different sauce?
Sure! You can use marinara, alfredo, or even pesto sauce.
17. Can I make these spicy?
Add some crushed red pepper flakes or spicy sausage for a kick of heat.
18. Do I need to grease the mold?
Yes, lightly grease the mold to prevent the dough from sticking.
19. What if the dough puffs up too much?
Prick the dough lightly with a fork before baking to release any trapped air.
20. How do I store unbaked pizza skulls?
Store them in the fridge on a baking sheet covered with plastic wrap for up to 1 day before baking.
Helpful Tips to Make It Even More Delightful:
- Use parchment paper to make sure nothing sticks to the baking sheet.
- Brush the dough with garlic butter before baking for extra flavor.
- Add a little Parmesan cheese on top of the pizza skulls before baking.
- Pre-cook your vegetables to reduce moisture inside the pizza skulls.
- Add a few red pepper flakes for a spicy twist.
- Use mini pepperonis for a more even distribution of toppings.
- Try different shapes like pumpkins or bats if you don’t have a skull mold.
- Add a thin layer of cheese on top before sealing for extra gooeyness.
- Serve with multiple dipping sauces like ranch or garlic butter.
- Add a layer of pesto inside for a fresh, herby flavor.
- For extra crispiness, bake directly on the rack for the last 5 minutes.
- Add a sprinkle of Italian seasoning to the dough before baking.
- Incorporate different types of olives for added depth.
- Use shredded chicken for a protein-packed version.
- Add sautéed mushrooms for a more gourmet feel.
- Mix mozzarella with other cheeses like gouda for extra richness.
- Serve with a spooky Halloween-themed dip for added fun.
- Add a layer of ricotta cheese for a creamier filling.
- Use a pastry brush to apply a light egg wash for a glossy finish.
- Top with fresh basil right after baking for a burst of flavor.
- Make a dessert version with Nutella and marshmallows.
- Bake in a mini muffin tin for bite-sized pizza skulls.
- Use roasted garlic in the filling for extra depth of flavor.
- Make a BBQ chicken version with BBQ sauce and chicken.
- Add bacon bits for a smoky, savory touch.
- Brush with olive oil and sprinkle sea salt on top for extra crunch.
- Let them cool slightly before serving so the filling doesn’t spill out.
- For a vegetarian version, load up on mushrooms, spinach, and bell peppers.
- Use puff pastry dough for a flakier texture.
- Serve with Halloween-themed napkins and plates for extra fun!
Secrets to Achieving the Perfect Halloween Pizza Skulls:
- Use fresh pizza dough for the best texture and flavor.
- Let the dough rest at room temperature for 10 minutes before rolling it out.
- Don’t overstuff the filling to avoid leaking.
- Pinch the dough edges well to ensure a tight seal.
- Preheat the oven fully for even baking.
- Use silicone skull molds for easy removal after baking.
- Cool the skulls for 5 minutes before removing from the mold to prevent tearing.
- Add a thin layer of mozzarella over the sauce before adding toppings to prevent soggy dough.
- Avoid watery toppings like tomatoes or high-moisture veggies without pre-cooking them.
- Use parchment paper or silicone mats for a non-stick surface.
- Score the tops lightly with a knife for a decorative look.
- Create a garlic-herb butter to brush on top after baking.
- Make sure the mold cavities are fully filled for well-shaped skulls.
- Rotate the baking sheet halfway through for even browning.
- Use a pizza cutter to neatly cut the dough.
- Experiment with different cheeses for unique flavor combos.
- Freeze the pizza skulls before baking for a quicker future meal.
- Use pizza dough that’s slightly chilled to make it easier to work with.
- Press the dough firmly into the mold to ensure it picks up all the details.
- Layer cheese both on top and bottom for the perfect cheesy pull.
- Sprinkle cornmeal on the baking sheet for added texture.
- Use cookie cutters to make fun shapes if you don’t have a mold.
- For extra crispy edges, brush the dough with olive oil.
- Make a stuffing mixture beforehand to save prep time.
- Let the pizza skulls rest for a few minutes after baking for better flavor melding.
- Make sure the dough isn’t too thick to avoid undercooked centers.
- Use a non-stick mold for easy release.
- Bake at a higher temperature for a quicker crisp (400°F for 10-12 minutes).
- Serve on a Halloween-themed tray for added spookiness.
- Pair with a themed Halloween drink like a spooky punch for a complete experience.
These tips and secrets will help you create the most delightful and perfectly shaped Halloween Pizza Skulls that are sure to be a hit at your next Halloween party or gathering!