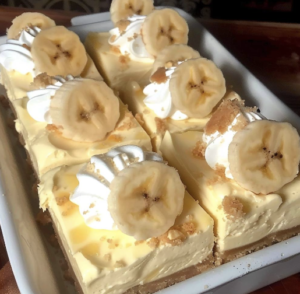
Banana Pudding Cheesecake Bars 😋😍
Ingredients
For Crust:
- 1 1/2 cups crushed Nilla Wafers
- 5 tablespoons butter, melted
- 2 tablespoons sugar
- Pinch of sea salt
For Filling:
- 1 1/2 (8-oz.) blocks cream cheese, softened
- 1/2 cup sugar
- 1 1/2 cups whipped topping
- 1 (3.4-oz.) package instant banana pudding mix
- 1 3/4 cups whole milk
For Topping:
- Whipped topping
- 1/2 banana, sliced
- 9 Nilla Wafers
Instructions
- Prepare Pan: Line an 8″-x-8″ pan with parchment paper, allowing some overhang for easy removal.
- Make Crust: In a medium bowl, combine crushed Nilla wafers with melted butter, sugar, and a pinch of sea salt. Mix until combined and press evenly into the prepared pan. Place in the freezer while preparing the filling.
- Make Cheesecake Filling:
- In a large bowl, using a hand mixer or stand mixer, beat the softened cream cheese until fluffy and smooth with no clumps remaining.
- Add sugar and continue to beat until well combined.
- Gently fold in the whipped topping and set aside.
- Prepare Pudding Mix: In a medium bowl, whisk together the instant banana pudding mix and milk. Refrigerate for about 3 minutes until the pudding thickens.
- Combine Pudding with Cheesecake: Fold the thickened pudding into the cream cheese mixture until well combined.
- Assemble Bars: Pour the filling into the prepared crust and smooth the top into an even layer. Freeze until the bars are firm, at least 6 hours or up to overnight.
- Serve: Once firm, remove from the freezer and slice into 9 bars. Top each bar with a dollop of whipped topping, a slice of banana, and a Nilla Wafer before serving.
Achieving the Perfect Banana Pudding Cheesecake Bars
To master the art of making Banana Pudding Cheesecake Bars, attention to detail and specific techniques are key. Here are 30 secrets to help you create the perfect batch:
Crust
- Use Fresh Nilla Wafers: Stale cookies won’t bind well, affecting the crust’s texture.
- Even Crumbs: Crush the wafers finely for a uniform crust.
- Proper Binding: Ensure the butter is melted completely and mixed well with the crumbs.
- Press Firmly: Use the bottom of a glass to press the crust firmly and evenly into the pan.
- Freeze the Crust: This step prevents the crust from mixing with the filling, ensuring a firm base.
Filling
- Room Temperature Cream Cheese: Softened cream cheese ensures a smooth, lump-free filling.
- Beat Until Fluffy: Cream cheese should be beaten until light and fluffy for a creamy texture.
- Gradual Sugar Addition: Add sugar gradually to ensure it’s well incorporated.
- Fold, Don’t Mix: Fold the whipped topping into the cream cheese mixture gently to maintain its airy texture.
- Proper Pudding Thickening: Ensure the pudding mix thickens properly before adding it to the filling.
- Cold Milk: Use cold milk for the pudding mix to help it set correctly.
- Chill Tools and Bowl: Chill the bowl and beaters before whipping the topping to achieve stiff peaks faster.
- Even Mixing: Make sure the pudding and cream cheese mixture are thoroughly combined for consistent flavor.
Assembly
- Smooth Layers: Use a spatula to smooth the filling layer evenly over the crust.
- Avoid Overfilling: Leave a small gap at the top of the pan to prevent overflow when topping.
- Proper Freezing: Freeze the bars until they are completely firm to ensure clean slicing.
Topping
- Fresh Ingredients: Use fresh whipped topping and bananas for the best flavor and appearance.
- Slice Bananas Thin: Thin banana slices look more appealing and are easier to eat.
- Even Distribution: Distribute the banana slices and Nilla Wafers evenly for a balanced taste in every bite.
Serving and Storage
- Thaw Slightly: Let the bars sit at room temperature for a few minutes before slicing to make cutting easier.
- Sharp Knife: Use a sharp knife dipped in hot water for clean slices.
- Storage: Store bars in an airtight container to keep them fresh.
- Refrigerate: Keep leftovers in the refrigerator to maintain their texture and flavor.
- Avoid Freezing Toppings: Add fresh toppings just before serving to prevent them from becoming soggy.
Flavor Enhancements
- Add Extracts: A few drops of banana or vanilla extract can enhance the flavor of the filling.
- Layered Flavors: Try adding a layer of sliced bananas between the crust and filling for extra banana flavor.
- Chocolate Drizzle: Drizzle melted chocolate over the bars before serving for an extra treat.
- Nut Crunch: Sprinkle crushed nuts on top for added texture and flavor.
Presentation
- Garnish Smartly: Use additional Nilla Wafers and fresh banana slices as garnish for a professional look.
- Serve Chilled: Always serve the bars chilled for the best texture and taste.
Most Popular Questions and Their Answers Related to Banana Pudding Cheesecake Bars
- Can I use a different type of cookie for the crust?
- Yes, you can use graham crackers, digestive biscuits, or any other cookie you prefer.
- Can I use fresh whipped cream instead of whipped topping?
- Yes, you can use homemade whipped cream. Just make sure it’s stabilized if you’re planning to keep the bars for a longer time.
- Can I make this recipe ahead of time?
- Absolutely! These bars need to be frozen for at least 6 hours, making them a great make-ahead dessert.
- Can I substitute the instant banana pudding mix?
- You can use another flavor of instant pudding mix if you prefer, but it will change the flavor profile of the dessert.
- How long can I store these bars in the freezer?
- They can be stored in the freezer for up to 2 weeks. Make sure to wrap them well to prevent freezer burn.
- Do I need to thaw the bars before serving?
- Allow them to sit at room temperature for about 10-15 minutes before serving for the best texture.
- Can I use a different type of milk?
- Whole milk is recommended for the best texture, but you can use 2% milk if needed. Avoid skim milk or non-dairy milk as they might not set as well.
- Can I make this recipe without a mixer?
- You can mix by hand, but a hand mixer or stand mixer will give you a smoother, fluffier filling.
- Can I add other toppings?
- Yes, you can add chocolate chips, caramel drizzle, or crushed nuts as additional toppings.
- What if I don’t have parchment paper?
- You can use aluminum foil instead, but grease it well to prevent sticking.
- Can I use low-fat cream cheese?
- Yes, but the texture might not be as rich and creamy.
- Can I double the recipe?
- Yes, just use a larger pan and adjust the freezing time if needed.
- How can I prevent the crust from being too crumbly?
- Make sure to press the crust firmly into the pan and freeze it while making the filling.
- Can I use pre-made crust?
- Yes, a store-bought crust can save time and work well with this recipe.
- Is there a substitute for Nilla Wafers?
- Graham crackers, shortbread cookies, or digestive biscuits can be used as substitutes.
- Can I make this gluten-free?
- Use gluten-free cookies for the crust and ensure all other ingredients are gluten-free.
- What can I use instead of sugar in the crust?
- You can use honey, agave, or a sugar substitute like stevia.
- How can I ensure the bars come out cleanly from the pan?
- Use parchment paper with an overhang and grease the sides of the pan lightly.
- Can I add other fruits?
- Yes, you can add other fruits like strawberries, blueberries, or kiwi as toppings.
- Can I use a different size pan?
- Yes, but adjust the thickness of the layers and the freezing time accordingly.
By following these tips and tricks, you’ll be able to perfect your Banana Pudding Cheesecake Bars and enjoy a delicious, creamy treat that’s sure to impress!