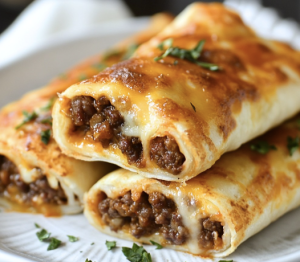
Cheesy Beefy Roll-Ups 

Ingredients:
1 pound ground beef
1/2 onion, finely chopped
2 cloves garlic, minced
Salt and pepper to taste
1 teaspoon paprika
1 cup marinara sauce
1 cup shredded mozzarella cheese
1/2 cup grated Parmesan cheese
6 large flour tortillas
1 tablespoon olive oil
Fresh parsley, chopped for garnish
Directions:
Preheat your oven to 375°F (190°C). Grease a baking dish.
In a skillet, heat the olive oil over medium heat. Add the onion and garlic, and sauté until softened.
Add the ground beef to the skillet. Season with salt, pepper, and paprika. Cook until browned and no longer pink. Drain any excess fat.
Stir in 1/2 cup of marinara sauce into the beef mixture. Remove from heat and let it cool slightly.
Lay out the flour tortillas on a flat surface. Divide the beef mixture evenly among the tortillas, spreading it near the edge closest to you.
Sprinkle the mozzarella and Parmesan cheeses over the beef on each tortilla.
Roll up the tortillas tightly, enclosing the filling.
Place the roll-ups seam side down in the prepared baking dish.
Brush the tops of the roll-ups with a little olive oil and bake for 15-20 minutes, or until they are golden and crispy.
Heat the remaining marinara sauce and serve it alongside the roll-ups for dipping.
Garnish with chopped parsley before serving.
Prep Time: 20 minutes | Cooking Time: 35 minutes | Total Time: 55 minutes
Kcal: 580 kcal per serving | Servings: 6 servings
Here are some popular questions and their answers related to Cheesy Beefy Roll-Ups:
- Can I Use Ground Turkey Instead of Ground Beef?
- Yes, you can substitute ground turkey for ground beef in this recipe if you prefer a leaner option. Just make sure to cook it thoroughly before assembling the roll-ups.
- Can I Make These Roll-Ups Ahead of Time?
- Absolutely! You can prepare the beef filling and assemble the roll-ups ahead of time. Simply cover them tightly with plastic wrap or aluminum foil and store them in the refrigerator until you’re ready to bake. You may need to adjust the baking time slightly if baking from cold.
- Can I Freeze These Roll-Ups?
- Yes, these roll-ups can be frozen before or after baking. If freezing before baking, assemble the roll-ups as instructed but do not bake them. Instead, wrap them tightly in plastic wrap and aluminum foil, then freeze for up to 3 months. When ready to eat, bake them directly from frozen, adding a few extra minutes to the baking time.
- What Can I Serve with Cheesy Beefy Roll-Ups?
- These roll-ups pair well with a variety of side dishes, such as a green salad, roasted vegetables, or garlic bread. You can also serve them with additional marinara sauce for dipping or a dollop of sour cream on top.
- Can I Customize the Fillings?
- Absolutely! Feel free to customize the fillings to suit your taste preferences. You can add diced bell peppers, sliced mushrooms, or any other favorite toppings to the beef mixture before rolling up the tortillas.
- How Do I Prevent the Roll-Ups from Unraveling?
- To prevent the roll-ups from unraveling during baking, make sure to roll them up tightly and place them seam side down in the baking dish. You can also secure them with toothpicks if needed, though remember to remove them before serving.
- Can I Make These Roll-Ups Vegetarian?
- Yes, you can make vegetarian roll-ups by omitting the ground beef and adding more vegetables or a meat substitute, such as cooked lentils or crumbled tofu, to the filling.
- Are These Roll-Ups Kid-Friendly?
- Absolutely! These cheesy beefy roll-ups are sure to be a hit with kids of all ages. They’re easy to eat with your hands and packed with delicious flavors that kids love.
- How Long Do Leftovers Last?
- Leftover roll-ups can be stored in an airtight container in the refrigerator for up to 3 days. Reheat them in the microwave or oven until heated through before serving.
- Can I Use Different Types of Cheese?
- Yes, feel free to experiment with different types of cheese in this recipe. Cheddar, Monterey Jack, or pepper jack cheese would all work well in place of mozzarella and Parmesan.
