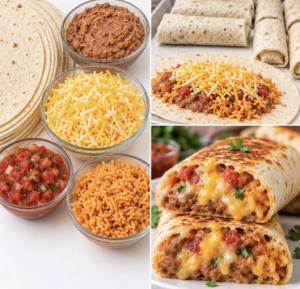
These Bean and Cheese Freezer Burritos are an easy, budget-friendly meal prep recipe made with creamy seasoned beans, rice, plenty of cheese, and soft flour tortillas.
They are designed specifically for freezing, which means you can prepare a large batch at once, wrap each burrito individually, and have quick lunches or dinners ready whenever you need them.
The filling is simple but satisfying: refried or mashed beans, seasoned rice, salsa, cheddar, and Monterey Jack. You can keep the burritos basic or add corn, green chiles, jalapeños, or extra vegetables.
They are perfect for busy weekdays, freezer meal prep, work lunches, school lunches, quick dinners, vegetarian meals, or budget-conscious family cooking.
Why You’ll Love This Recipe
Made for the freezer. Prepare a batch once and reheat individual burritos as needed.
Budget-friendly. Beans, rice, tortillas, and cheese are inexpensive pantry staples.
Easy meal prep. One cooking session can make several future meals.
Vegetarian. No meat is required for a filling, satisfying burrito.
Customizable. Add corn, peppers, salsa, green chiles, or different cheeses.
Family-friendly. Mild flavors make them easy to serve to kids.
Quick reheating. Microwave, oven, skillet, or air fryer all work.
Ingredients
Bean Filling
- 2 cans refried beans, about 16 ounces each
- ½ cup salsa
- 1 teaspoon chili powder
- 1 teaspoon ground cumin
- ½ teaspoon garlic powder
- ½ teaspoon onion powder
- ¼ teaspoon smoked paprika
Rice
- 2 cups cooked rice
- ½ cup salsa
- 1 tablespoon lime juice
- 2 tablespoons chopped cilantro, optional
Cheese
- 2 cups shredded cheddar
- 1½ cups shredded Monterey Jack
Burritos
- 10–12 large flour tortillas
Optional Add-Ins
- 1 cup corn
- 1 can black beans, drained
- 1 can diced green chiles
- Finely diced bell peppers
- Pickled jalapeños
- Green onions
For Serving
- Salsa
- Sour cream
- Guacamole
- Hot sauce
- Pico de gallo
Ingredient Notes
Refried Beans
Refried beans create a creamy filling that freezes very well.
You can use:
- Pinto refried beans
- Black refried beans
- Homemade mashed beans
If the beans are very thick, stir in a spoonful of salsa or water.
Rice
White or brown rice both work.
Make sure the rice is fully cooked and cooled slightly before assembling.
Rice that is too wet can make the tortillas soggy.
Cheese
Cheddar gives bold flavor while Monterey Jack melts smoothly.
You can also use:
- Colby-Jack
- Pepper Jack
- Mexican-style cheese blend
Tortillas
Use large burrito-size flour tortillas.
Warm them briefly before rolling so they stay flexible and do not crack.
How to Make Bean and Cheese Freezer Burritos
Step 1: Prepare the Bean Filling
Add the refried beans to a saucepan over medium-low heat.
Stir in:
- Salsa
- Chili powder
- Cumin
- Garlic powder
- Onion powder
- Smoked paprika
Cook for approximately:
4–5 minutes
until hot and smooth.
Remove from the heat.
Step 2: Season the Rice
In a bowl, combine:
- Cooked rice
- Salsa
- Lime juice
- Optional cilantro
Mix until evenly seasoned.
Step 3: Prepare the Cheese
Combine cheddar and Monterey Jack in a bowl.
Set aside.
Step 4: Warm the Tortillas
Warm the tortillas briefly in:
- A dry skillet
- The microwave
- The oven
They only need to become soft and flexible.
Step 5: Add Beans
Place one tortilla on a flat surface.
Spread approximately:
⅓ cup bean mixture
across the center.
Leave space around the edges.
Step 6: Add Rice
Add approximately:
¼ cup seasoned rice.
Step 7: Add Cheese
Sprinkle generously with the cheese mixture.
Step 8: Add Optional Ingredients
Add small amounts of:
- Corn
- Black beans
- Green chiles
- Jalapeños
Do not overfill.
Step 9: Fold the Burrito
Fold the left and right sides inward.
Bring the bottom edge up and over the filling.
Roll tightly toward the top.
Step 10: Place Seam-Side Down
Place the finished burrito seam-side down while assembling the remaining burritos.
Step 11: Cool Completely
Before freezing, make sure the filling is no longer hot.
This helps prevent condensation and ice crystals.
Step 12: Wrap Individually
Wrap each burrito tightly in:
- Parchment paper
- Plastic wrap
- Foil
For microwave reheating, parchment or plastic wrap is more convenient than foil.
Step 13: Freeze
Place the wrapped burritos inside a large freezer-safe bag or container.
Label with the date.
Freeze until solid.
Expert Tips for the Best Freezer Burritos
Cool the filling first. Hot filling creates condensation inside the wrapping.
Don’t overfill. Smaller burritos are easier to roll and reheat evenly.
Use thick salsa. Watery salsa can make the tortillas soggy.
Keep the rice fairly dry. Moisture is the biggest enemy of freezer burritos.
Roll tightly. A tight burrito stays together better after reheating.
Wrap individually. This prevents freezer burn and makes portions easier to grab.
Label the freezer bag. Include the recipe name and freezing date.
Delicious Variations
Black Bean and Cheese Burritos
Replace refried beans with seasoned mashed black beans.
Bean, Rice and Corn Burritos
Add corn to the filling for sweetness and texture.
Spicy Jalapeño Bean Burritos
Use:
- Pepper Jack
- Jalapeños
- Hot salsa
Green Chile Bean Burritos
Add diced green chiles and Monterey Jack.
Southwest Freezer Burritos
Add:
- Black beans
- Corn
- Bell peppers
- Smoked paprika
Breakfast Bean Burritos
Add cooked scrambled eggs before freezing.
If using eggs, cool them completely before assembly.
High-Protein Bean Burritos
Add extra black beans and reduce the rice slightly.
Serve with Greek yogurt instead of sour cream.
Cheesy Bean Burritos
Skip the rice and use extra beans and cheese for a simpler version.
Make Ahead & Freezer Meal Prep
These burritos are designed specifically for meal prep.
A good workflow is:
- Cook rice.
- Season beans.
- Prepare cheese.
- Cool everything.
- Assemble all burritos.
- Wrap individually.
- Freeze in one large labeled freezer bag.
For busy households, make a double batch so you have several weeks of quick meals available.
How to Freeze Bean and Cheese Burritos
Let all cooked ingredients cool before assembly.
Wrap each burrito tightly.
For extra freezer protection, use two layers:
First layer: parchment or plastic wrap
Second layer: freezer-safe bag or container
Try to remove as much excess air as possible.
For best quality, use within approximately:
2–3 months.
How to Reheat Frozen Burritos
Microwave
Remove foil if used.
Wrap the frozen burrito in a slightly damp paper towel.
Microwave for approximately:
2–4 minutes,
turning halfway through.
Exact timing depends on microwave wattage and burrito size.
Let stand briefly before eating because the filling can be much hotter than the tortilla.
Oven
Wrap the frozen burrito in foil.
Bake at:
375°F
for approximately:
35–45 minutes,
or until hot throughout.
Remove the foil during the final few minutes if you want a crisper tortilla.
Air Fryer
Remove all freezer wrapping.
Air fry at approximately:
350°F
until heated through and crisp outside.
Depending on thickness, this can take roughly:
12–18 minutes.
Skillet
Thaw the burrito first.
Heat in a lightly greased skillet over medium-low heat.
Turn occasionally until the tortilla is golden and the center is hot.
Storage
Refrigerator
Freshly assembled burritos can be refrigerated for approximately:
3–4 days.
Keep wrapped or stored in an airtight container.
Freezer
For best texture and flavor, use frozen burritos within:
2–3 months.
Keep tightly wrapped to reduce freezer burn.
Frequently Asked Questions
Can I freeze bean and cheese burritos?
Yes. They are one of the easiest homemade freezer meals.
Do I need to thaw them before reheating?
No. They can be reheated directly from frozen.
Can I use brown rice?
Absolutely.
Can I use black beans?
Yes. Use refried black beans or mash cooked black beans with seasonings.
Why are my freezer burritos soggy?
The filling may have been too hot or wet before freezing.
Can I add salsa inside?
Yes, but use a thick salsa and don’t add too much.
What cheese freezes best?
Cheddar, Monterey Jack, Colby-Jack, and similar melting cheeses all work well.
Can I add vegetables?
Yes. Bell peppers, corn, green chiles, and onions are good options.
Can I freeze sour cream inside?
It is better to add sour cream after reheating because the texture can change during freezing.
Can I make these spicy?
Yes. Add jalapeños, Pepper Jack, hot salsa, or hot sauce.
Printable Bean and Cheese Freezer Burritos Recipe
Prep Time: 25 minutes
Cook Time: 10 minutes
Yield: 10–12 burritos
Ingredients
- 2 cans refried beans
- 1 cup salsa, divided
- 1 teaspoon chili powder
- 1 teaspoon cumin
- ½ teaspoon garlic powder
- ½ teaspoon onion powder
- ¼ teaspoon smoked paprika
- 2 cups cooked rice
- 1 tablespoon lime juice
- 2 cups shredded cheddar
- 1½ cups Monterey Jack
- 10–12 large flour tortillas
Instructions
- Warm refried beans in a saucepan.
- Add ½ cup salsa and seasonings.
- Mix cooked rice with remaining salsa and lime juice.
- Combine shredded cheeses.
- Warm tortillas until flexible.
- Add about ⅓ cup beans to each tortilla.
- Add about ¼ cup rice.
- Add shredded cheese.
- Add optional vegetables if desired.
- Fold sides inward.
- Roll tightly.
- Cool completely.
- Wrap each burrito individually.
- Place in a freezer-safe bag.
- Freeze for up to about 2–3 months.
- Reheat directly from frozen as needed.
Final Thoughts
Bean and Cheese Freezer Burritos are one of the easiest ways to turn inexpensive pantry ingredients into practical make-ahead meals.
Creamy seasoned beans, rice, salsa, cheddar, and Monterey Jack create a filling burrito that freezes well and can be reheated whenever you need a quick lunch or dinner.
They are especially useful for meal prep because you can make a large batch at once and customize different burritos with black beans, corn, green chiles, jalapeños, or extra cheese.