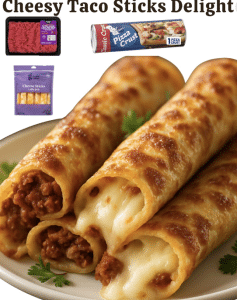
Cheesy Taco Sticks

Cheesy Taco Sticks

These fun, cheesy, taco-flavored snacks are perfect for parties, game days, or family gatherings. They’re simple to make and bursting with bold flavors.


Ingredients:

  • 1 pound ground beef
  • 1 packet taco seasoning (or 2 tablespoons homemade taco seasoning)
  • 1 can refrigerated breadstick dough (or crescent roll dough)
  • 1 cup shredded cheddar cheese (or a Mexican cheese blend)
  • 1/2 cup salsa (for serving)
  • Optional toppings: sour cream, diced tomatoes, chopped green onions, or jalapeños

Instructions:

Step 1: Prepare the Taco Filling

  1. Preheat your oven to 375°F (190°C).
  2. In a medium skillet, cook the ground beef over medium heat until browned.
  3. Drain any excess fat, then stir in the taco seasoning and a splash of water. Let it simmer for 2-3 minutes until fully combined.

Step 2: Assemble the Taco Sticks

  1. Unroll the breadstick dough onto a clean surface. If using crescent roll dough, pinch the seams together to form a flat sheet, then cut into strips.
  2. Cut each breadstick or strip of dough in half lengthwise to create smaller pieces.
  3. Place a spoonful of the beef mixture on each piece of dough.
  4. Sprinkle a generous amount of shredded cheese on top of the beef.
  5. Roll up the dough tightly around the filling, pinching the edges to seal.

Step 3: Bake the Taco Sticks

  1. Place the assembled taco sticks seam-side down on a baking sheet lined with parchment paper or lightly greased.
  2. Bake for 15-20 minutes, or until the dough is golden brown and the cheese is melted.

Step 4: Serve and Enjoy

  1. Serve the taco sticks warm with salsa for dipping and your favorite toppings, like sour cream, diced tomatoes, or chopped green onions.

Tips for Success:

  1. Customize the cheese: Use pepper jack, mozzarella, or Monterey Jack for a different flavor.
  2. Add veggies: Include diced bell peppers or onions in the beef mixture for extra texture and flavor.
  3. Make them spicy: Mix diced jalapeños or a splash of hot sauce into the beef filling for a spicy kick.
  4. Use homemade dough: If you prefer, make your own bread dough for a fresh, homemade touch.
  5. Seal well: Ensure the dough is tightly sealed to prevent the filling from spilling out during baking.

Serving Suggestions:

  • Pair with additional dips like guacamole, queso, or sour cream.
  • Serve alongside a fresh salad or chips for a complete meal.
  • Enjoy them as finger food at parties or game nights.

These Cheesy Taco Sticks are sure to be a crowd-pleaser with their gooey cheese, savory beef, and crispy golden crust! 🌮🧀✨

Here are 30 tips to make your Cheesy Taco Sticks even more decadent and irresistible:


Flavor Enhancements (1–10)

  1. Use seasoned cheese: Swap plain cheddar with a Mexican blend or pepper jack for added spice.
  2. Add garlic butter: Brush the outside of the dough with melted garlic butter before baking for extra flavor.
  3. Incorporate queso: Spread a layer of queso dip inside the dough before adding the beef.
  4. Add fresh herbs: Sprinkle chopped cilantro or parsley on the finished taco sticks for a fresh touch.
  5. Use chorizo: Replace or mix ground beef with chorizo for a spicier, richer filling.
  6. Mix in taco sauce: Stir taco sauce into the beef mixture for even more flavor.
  7. Add chipotle seasoning: Mix in some chipotle powder or adobo sauce for a smoky kick.
  8. Use flavored dough: Try garlic, herbed, or jalapeño-flavored dough for a unique twist.
  9. Stuff with cream cheese: Spread a layer of softened cream cheese inside the dough for extra creaminess.
  10. Incorporate lime zest: Add a sprinkle of lime zest over the taco sticks after baking for a fresh citrus boost.

Texture Upgrades (11–20)

  1. Sprinkle with Parmesan: Add grated Parmesan on top of the dough before baking for a crispy, cheesy crust.
  2. Add crunchy toppings: Mix crushed tortilla chips or corn chips into the beef filling for added crunch.
  3. Include refried beans: Spread a thin layer of refried beans on the dough before adding the beef mixture.
  4. Stuff with veggies: Add finely diced bell peppers, onions, or roasted corn for a hearty filling.
  5. Use crispy bacon: Add crumbled bacon inside the dough for an extra savory bite.
  6. Top with breadcrumbs: Sprinkle seasoned breadcrumbs on the dough for a golden, crispy coating.
  7. Double-layer cheese: Add a layer of shredded cheese both inside and on top of the taco sticks before baking.
  8. Add jalapeños: Include diced jalapeños in the filling for a spicy, crunchy surprise.
  9. Glaze with honey butter: Brush the baked taco sticks with honey butter for a sweet-savory twist.
  10. Include avocado: Add thin slices of avocado inside the dough for a creamy texture.

Creative Presentations (21–25)

  1. Make them bite-sized: Cut the dough into smaller pieces for mini taco sticks, perfect for parties.
  2. Shape into spirals: Roll the dough into spirals instead of sticks for a fun presentation.
  3. Add colorful toppings: Garnish with diced red and green peppers for a vibrant finish.
  4. Create a dipping platter: Serve taco sticks with an assortment of dips like guacamole, salsa, and queso.
  5. Arrange like a wreath: Place the taco sticks in a circular pattern on the baking sheet for a festive look.

Advanced Fillings (26–30)

  1. Use pulled pork or chicken: Swap ground beef for shredded pulled pork or chicken for a twist on the classic.
  2. Make it cheesy inside-out: Wrap shredded cheese on the outside of the dough for an extra crispy, cheesy crust.
  3. Add mac and cheese: Include a spoonful of creamy mac and cheese in the filling for over-the-top decadence.
  4. Stuff with mashed potatoes: Mix seasoned mashed potatoes with the beef for a hearty and comforting filling.
  5. Include breakfast ingredients: Turn them into breakfast taco sticks with scrambled eggs, sausage, and cheese.

Bonus Tips:

  • Experiment with sauces: Drizzle the finished sticks with sour cream, salsa, or a spicy chipotle mayo.
  • Reheat properly: If reheating, use the oven or air fryer to maintain the crispy texture.
  • Add sweetness: Include a drizzle of honey or maple syrup for a sweet and savory combination.

With these tips, your Cheesy Taco Sticks will become a decadent, show-stopping snack that no one can resist! 🌮🧀✨

Here are 30 popular questions and answers about Cheesy Taco Sticks to help you perfect this fun and flavorful snack:


General Recipe Questions

  1. What are cheesy taco sticks?
    They are breadstick dough stuffed with seasoned taco meat, cheese, and baked until golden, creating a cheesy, savory snack.
  2. Can I make these ahead of time?
    Yes, you can assemble them and refrigerate for up to 8 hours before baking.
  3. Do I need to pre-cook the meat?
    Yes, the ground beef needs to be browned and seasoned before stuffing the dough.
  4. What temperature should I bake them at?
    Bake at 375°F (190°C) for 15–20 minutes.
  5. How do I know when they’re done?
    The dough should be golden brown, and the cheese should be melted.

Ingredients Questions

  1. What kind of cheese works best?
    Cheddar, mozzarella, or a Mexican blend works well for a gooey, melty texture.
  2. Can I use a different meat?
    Yes, ground chicken, turkey, or even crumbled tofu can replace ground beef.
  3. What if I don’t have taco seasoning?
    Make your own with chili powder, cumin, paprika, garlic powder, onion powder, oregano, and salt.
  4. Can I use crescent roll dough instead of breadstick dough?
    Absolutely! Crescent roll dough works perfectly as a substitute.
  5. What kind of salsa should I serve with them?
    Any salsa works, but chunky or restaurant-style salsa pairs especially well.

Preparation Questions

  1. How thin should I roll the dough?
    Roll it to about 1/4 inch thick to make it easy to fold and seal around the filling.
  2. How do I keep the filling from spilling out?
    Don’t overfill the dough, and pinch the edges tightly to seal.
  3. Can I add raw veggies to the filling?
    It’s better to use cooked or sautéed veggies, as raw ones may release water and make the dough soggy.
  4. Should I grease the baking sheet?
    Use parchment paper or a lightly greased baking sheet to prevent sticking.
  5. Can I freeze the unbaked sticks?
    Yes! Assemble them, freeze on a tray, then store in a freezer bag. Bake from frozen, adding 5–10 minutes to the baking time.

Flavor and Customization Questions

  1. Can I make them spicy?
    Add diced jalapeños, hot sauce, or spicy taco seasoning to the filling for heat.
  2. Can I add beans to the filling?
    Yes, refried beans or black beans make a great addition to the taco filling.
  3. What other toppings can I use?
    Sour cream, guacamole, diced tomatoes, and chopped green onions are all great options.
  4. Can I add rice?
    Cooked Mexican rice can be added to the filling for a heartier snack.
  5. Can I brush them with something before baking?
    Brush with melted butter or an egg wash for a golden, shiny finish.

Serving and Storage Questions

  1. How should I serve them?
    Serve warm with salsa, sour cream, or queso for dipping.
  2. Are they good as leftovers?
    Yes, reheat them in the oven or air fryer to restore their crispiness.
  3. Can I serve them cold?
    They’re best served warm, but they can be eaten cold if needed.
  4. How long do they stay fresh?
    Store leftovers in an airtight container in the refrigerator for up to 3 days.
  5. Can I freeze baked taco sticks?
    Yes! Cool completely, then freeze in a single layer. Reheat in the oven or air fryer when ready to eat.

Cooking Tips and Troubleshooting

  1. Why is the dough not cooking through?
    Make sure the oven is fully preheated and avoid overfilling the dough.
  2. What if the cheese leaks out?
    Seal the edges of the dough tightly and bake seam-side down.
  3. How do I keep the taco sticks from getting soggy?
    Don’t overfill with wet ingredients like salsa, and bake them on a parchment-lined sheet.
  4. Can I make these in an air fryer?
    Yes! Air fry at 350°F for 8–10 minutes, flipping halfway through.
  5. How do I make them crispier?
    Brush with olive oil or butter before baking, and bake them on a wire rack for better airflow.


SAVE IT FOR LATER IN PINTEREST