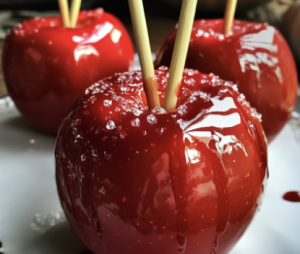
Candied Apples for Halloween Recipe
Get ready to treat yourself to a deliciously spooky Halloween treat with these homemade Candied Apples! Perfect for a festive party or as a fun activity with family, these apples are coated in a glossy, sweet candy shell and can be decorated with Halloween-themed sprinkles for extra flair.
Ingredients:
- 6 medium-sized apples
- 2 cups granulated sugar
- 1/2 cup light corn syrup
- 1/2 cup water
- Red food coloring
- Halloween-themed sprinkles
Instructions:
- Prepare the Apples:
- Wash and dry the apples thoroughly to remove any wax residue. Remove the stems and insert wooden sticks or popsicle sticks into the top of each apple.
- Make the Candy Coating:
- In a medium saucepan, combine the sugar, corn syrup, and water. Bring the mixture to a boil over medium-high heat, stirring constantly to dissolve the sugar.
- Monitor Temperature:
- Once the sugar dissolves, stop stirring and continue to cook the mixture until it reaches 300°F (the hard crack stage) on a candy thermometer. This process usually takes about 10 minutes.
- Add Food Coloring:
- Remove the saucepan from the heat and add a few drops of red food coloring, stirring quickly to combine. You can also use other colors for different themed apples!
- Dip the Apples:
- Working quickly, dip each apple into the candy mixture, tilting the pan and swirling the apples to coat them evenly. Allow the excess candy to drip off before placing the apples onto a baking sheet lined with parchment paper.
- Decorate:
- While the candy is still wet, decorate the apples with Halloween-themed sprinkles, crushed candies, or edible glitter. Work fast as the candy sets quickly.
- Let Cool:
- Let the apples cool and harden completely at room temperature for about 30-45 minutes before serving.
Nutrition Information (Per Serving):
- Calories: 200 kcal
- Total Fat: 0g
- Carbohydrates: 50g
- Protein: 0g
20 Popular Questions and Answers Related to Candied Apples:
- Can I use other types of apples?
- Yes, you can use any variety of apples, but tart apples like Granny Smiths balance well with the sweetness of the candy coating.
- How do I prevent bubbles in the candy coating?
- Stir gently and only in the beginning. Once the mixture reaches a boil, stop stirring to avoid introducing air bubbles.
- Can I make the candy coating in different colors?
- Yes! Add any color of food coloring to match your Halloween theme.
- What if I don’t have a candy thermometer?
- Test the candy by dropping a small amount into cold water. If it hardens immediately and cracks, it’s ready.
- Can I add flavoring to the candy?
- Yes, you can add a few drops of flavored extracts like cinnamon or vanilla after removing the mixture from the heat.
- How do I prevent the candy from sliding off the apples?
- Make sure the apples are completely dry and free of wax before dipping them into the candy.
- How long do candied apples last?
- Candied apples last up to 2 days when stored at room temperature in an airtight container.
- Can I refrigerate candied apples?
- It’s best not to refrigerate them as the moisture can cause the candy coating to become sticky.
- How can I keep the candy from hardening too fast?
- Work quickly while dipping, and if the candy starts to harden, you can reheat it gently on the stove.
- What if my candy mixture hardens before I finish dipping the apples?
- Simply place the saucepan back on low heat to re-melt the candy coating.
- Can I use honey instead of corn syrup?
- Honey can affect the texture and flavor, so it’s better to stick with corn syrup for this recipe.
- How do I clean the pan after making candied apples?
- Soak the pan in hot water to dissolve the hardened candy, then wash as usual.
- What if the candy coating is too thick?
- You can add a little more water to the mixture to thin it out, but be cautious not to overdo it.
- Can I add edible glitter or shimmer to the apples?
- Yes! Edible glitter can be added right after dipping the apples, while the candy coating is still wet.
- How do I make black candied apples?
- Use black food coloring instead of red to create spooky black apples.
- How do I keep the candy coating smooth?
- Make sure the sugar is fully dissolved before boiling and avoid stirring once the mixture starts boiling.
- Can I use other decorations besides sprinkles?
- Absolutely! Try crushed nuts, cookie crumbs, or edible googly eyes for extra fun.
- What’s the best way to store leftover candied apples?
- Store them in an airtight container at room temperature, ensuring they don’t touch each other.
- Can I make mini candied apples?
- Yes! Use small apples or even large apple slices skewered with toothpicks for bite-sized treats.
- Why did my candy coating turn grainy?
- This can happen if the sugar isn’t fully dissolved. Stir until it’s completely smooth before boiling.
30 Helpful Tips to Make Candied Apples Even More Delightful:
- Choose tart apples like Granny Smiths for a nice contrast with the sweet candy coating.
- Dry the apples completely after washing to ensure the candy sticks properly.
- Chill the apples before dipping for a quicker candy set.
- Add edible glitter for a magical touch.
- Use black food coloring to create spooky, Halloween-themed apples.
- Dip in white chocolate after the candy sets for a two-tone effect.
- Add cinnamon extract for a warm, spicy twist.
- Swirl food coloring into the candy for a marbled effect.
- Make mini candied apples using smaller apple varieties for bite-sized treats.
- Use lollipop sticks or sturdy twigs for a fun presentation.
- Roll in crushed cookies after dipping for a crunchy exterior.
- Use silicone baking mats instead of parchment paper for easy cleanup.
- Dip the apples twice for a thicker candy coating.
- Use a spoon to drizzle extra candy over any missed spots.
- Add metallic food paint for a shimmering effect.
- Insert a treat inside the apple (like caramel or peanut butter) before dipping.
- Sprinkle sea salt over the candy coating for a sweet-salty combination.
- Store apples with parchment paper between them to prevent sticking.
- Add a teaspoon of vanilla to the candy mix for extra flavor.
- Dip the bottoms of the apples in melted chocolate after the candy sets for a delicious base.
- Sprinkle crushed candy canes over the top for a holiday twist.
- Use different colors of candy for a variety of themed apples.
- Decorate with edible googly eyes for fun Halloween faces.
- Layer candy coatings (like caramel first, then candy) for a gourmet treat.
- Mix in coconut flakes for a tropical twist.
- Add glittery sugar for a sparkling finish.
- Drizzle melted chocolate in spooky designs over the candy coating.
- Keep a wet cloth nearby to wipe hands between dips, as the candy can get sticky.
- Garnish with edible flowers for a unique look.
- Make a candy apple bar at parties, letting guests dip and decorate their own apples.
40 Secrets to Achieving the Perfect Candied Apples:
- Use a candy thermometer to ensure the mixture reaches exactly 300°F.
- Work quickly when dipping the apples before the candy hardens.
- Wash apples with hot water to remove any wax residue.
- Let excess candy drip off before setting the apples down to avoid pooling.
- Use room temperature apples to ensure even candy coating.
- Lightly grease the parchment paper to prevent sticking.
- Avoid stirring the candy while boiling to prevent crystallization.
- Test candy readiness by dropping a small amount in cold water—it should harden immediately.
- Keep a bowl of cold water nearby for emergency cooling if the candy starts to overcook.
- Use distilled water for the candy mixture to prevent impurities.
- Stir the food coloring well to avoid streaks in the candy.
- Dip apples at an angle for better coverage and swirling effect.
- Use firm, fresh apples for the best texture.
- Place dipped apples on a cold baking sheet to speed up the hardening process.
- Stir in cream of tartar to prevent crystallization in the sugar syrup.
- Use wooden sticks for stability when dipping.
- Don’t dip apples too deep; leave a bit of the top visible for a more polished look.
- Ensure the candy reaches the correct temperature to avoid a chewy or soft coating.
- Avoid humid environments while making the candy, as it can affect the candy setting.
- Reheat the candy mixture gently if it begins to harden during dipping.
- Add a pinch of salt to the candy mix for flavor contrast.
- Use light corn syrup for a clear, glossy candy coating.
- Use a deep saucepan to make dipping easier.
- Add gold or silver dust for an elegant touch.
- Keep the apples spaced apart on the baking sheet to avoid sticking together.
- Experiment with apple varieties like Honeycrisp or Fuji for different textures.
- Dip the apples slowly to ensure an even coating without bubbles.
- Make sure the sticks are centered in the apples to avoid uneven dipping.
- Boil at a steady medium-high heat for the best results.
- Don’t touch the candy coating while it’s still hot to prevent fingerprints.
- Use silicone spatulas to stir the mixture to avoid sticking.
- If using black food coloring, add extra drops for a bold color.
- Add glow-in-the-dark sprinkles for an eerie Halloween look.
- Soak apples in lemon water for a few minutes to prevent browning before dipping.
- Let the candy mixture cool slightly before dipping to avoid it being too runny.
- Cut apples into slices for easier eating, then dip and coat them individually.
- Place dipped apples on wire racks to allow excess candy to drip off.
- Tap the apple lightly after dipping to remove excess candy.
- Check the weather! Humidity can affect the candy’s ability to set properly.
- Sprinkle finely chopped nuts for added crunch and flavor.
By following these detailed instructions, answering common questions, utilizing helpful tips, and mastering these secrets, you’ll create the perfect Candied Apples for Halloween that will wow your guests and make your Halloween celebration unforgettable!